Hi developers, welcome you all in another article on how to make the Razorpay payment gateway setup in CodeIgniter. I hope, you must have integrated other payment gateways like PayUmoney, Paytm payment gateway, etc.
If you didn’t don’t worry follow the steps as I have given you, you will able to achieve without any errors.
Razorpay is the most popular payment gateway in India. Razorpay provides clean, fast,
secure payments services with hassle-free integration with developer-friendly APIs.
So without wasting the time, lets come directly for which you came.
I am expecting you that, you all are up with your Razorpay account, and you got your RAZOR_KEY, RAZOR_SECRET_KEY.
Check this also Login with Google account: using JavaScript OAuth Library
What do we need to Razorpay payment gateway setup?
- A CodeIgniter project
- A Controller of which index function will load a form view
- If you want to save information to the database then you create a model also.
- We need a form view file
- Last but not least, follow the steps carefully, don’t worry if your code does not work. I will provide the source code also.
Step 1: Get the keys and define them in the project
Open the “application/config/constants.php” file, at the end of the fine define constants:
  <?php
    define('RAZOR_KEY_ID', 'XXXXXXXXXX');
    define('RAZOR_KEY_SECRET', 'XXXXXXXXXX');
  ?>
Step 2: Create a controller “Register.php”
Got to “application/controllers/” create a PHP file named “Register.php” and paste the following code.
<?php
defined('BASEPATH') OR exit('No direct script access allowed');
require_once(APPPATH."libraries/razorpay/razorpay-php/Razorpay.php");

use Razorpay\Api\Api;
use Razorpay\Api\Errors\SignatureVerificationError;

class Register extends CI_Controller {
	/**
	 * This function loads the registration form
	 */
	public function index()
	{
		$this->load->view('register');
	}

	/**
	 * This function creates order and loads the payment methods
	 */
	public function pay()
	{
		$api = new Api(RAZOR_KEY, RAZOR_SECRET_KEY);
		/**
		 * You can calculate payment amount as per your logic
		 * Always set the amount from backend for security reasons
		 */
		$_SESSION['payable_amount'] = 10;

		$razorpayOrder = $api->order->create(array(
			'receipt'         => rand(),
			'amount'          => $_SESSION['payable_amount'] * 100, // 2000 rupees in paise
			'currency'        => 'INR',
			'payment_capture' => 1 // auto capture
		));


		$amount = $razorpayOrder['amount'];

		$razorpayOrderId = $razorpayOrder['id'];

		$_SESSION['razorpay_order_id'] = $razorpayOrderId;

		$data = $this->prepareData($amount,$razorpayOrderId);

		$this->load->view('rezorpay',array('data' => $data));
	}

	/**
	 * This function verifies the payment,after successful payment
	 */
	public function verify()
	{
		$success = true;
		$error = "payment_failed";
		if (empty($_POST['razorpay_payment_id']) === false) {
			$api = new Api(RAZOR_KEY, RAZOR_SECRET_KEY);
		try {
				$attributes = array(
					'razorpay_order_id' => $_SESSION['razorpay_order_id'],
					'razorpay_payment_id' => $_POST['razorpay_payment_id'],
					'razorpay_signature' => $_POST['razorpay_signature']
				);
				$api->utility->verifyPaymentSignature($attributes);
			} catch(SignatureVerificationError $e) {
				$success = false;
				$error = 'Razorpay_Error : ' . $e->getMessage();
			}
		}
		if ($success === true) {
			/**
			 * Call this function from where ever you want
			 * to save save data before of after the payment
			 */
			$this->setRegistrationData();

			redirect(base_url().'register/success');
		}
		else {
			redirect(base_url().'register/paymentFailed');
		}
	}

	/**
	 * This function preprares payment parameters
	 * @param $amount
	 * @param $razorpayOrderId
	 * @return array
	 */
	public function prepareData($amount,$razorpayOrderId)
	{
		$data = array(
			"key" => RAZOR_KEY,
			"amount" => $amount,
			"name" => "Coding Birds Online",
			"description" => "Learn To Code",
			"image" => "https://demo.codingbirdsonline.com/website/img/coding-birds-online/coding-birds-online-favicon.png",
			"prefill" => array(
				"name"  => $this->input->post('name'),
				"email"  => $this->input->post('email'),
				"contact" => $this->input->post('contact'),
			),
			"notes"  => array(
				"address"  => "Hello World",
				"merchant_order_id" => rand(),
			),
			"theme"  => array(
				"color"  => "#F37254"
			),
			"order_id" => $razorpayOrderId,
		);
		return $data;
	}

	/**
	 * This function saves your form data to session,
	 * After successfull payment you can save it to database
	 */
	public function setRegistrationData()
	{
		$name = $this->input->post('name');
		$email = $this->input->post('email');
		$contact = $this->input->post('contact');
		$amount = $_SESSION['payable_amount'];

		$registrationData = array(
			'order_id' => $_SESSION['razorpay_order_id'],
			'name' => $name,
			'email' => $email,
			'contact' => $contact,
			'amount' => $amount,
		);
		// save this to database

	}

	/**
	 * This is a function called when payment successfull,
	 * and shows the success message
	 */
	public function success()
	{
		$this->load->view('success');
	}
	/**
	 * This is a function called when payment failed,
	 * and shows the error message
	 */
	public function paymentFailed()
	{
		$this->load->view('error');
	}
}
Step 2: Create view files “registration-form.php” and “rezorpay.php”
Got to “application/views/” create two files named “registration-form.php” and “rezorpay.php” and paste the following code respectively.
registration-form.php
<!doctype html>
<html lang="en">
<head><meta http-equiv="Content-Type" content="text/html; charset=utf-8">
    <meta name="viewport" content="width=device-width, user-scalable=no, initial-scale=1.0, maximum-scale=1.0, minimum-scale=1.0">
    <meta http-equiv="X-UA-Compatible" content="ie=edge">
    <link rel="icon" href="https://codingbirdsonline.com/wp-content/uploads/2019/12/cropped-coding-birds-favicon-2-1-192x192.png" type="image/x-icon">
    <link rel="stylesheet" href="https://stackpath.bootstrapcdn.com/bootstrap/4.3.1/css/bootstrap.min.css">
    <link rel="stylesheet" href="https://use.fontawesome.com/releases/v5.8.2/css/all.css">
    <script type="text/javascript" src="https://cdnjs.cloudflare.com/ajax/libs/jquery/3.4.1/jquery.slim.min.js"></script>
    <script type="text/javascript" src="https://stackpath.bootstrapcdn.com/bootstrap/4.3.1/js/bootstrap.bundle.min.js"></script>
    <title>Razorpay Payment Gateway: How to integration Razorpay payment gatway in CodeIgniter,PHP | CodingBirdsOnline</title>
</head>
<body>
<div class="container">
    <div class="row">
        <div class="col-sm-9 col-md-7 col-lg-5 mx-auto">
            <div class="card card-signin my-5">
                <div class="card-body">
                    <h5 class="card-title text-center">Razor Pay Integration in CodeIgniter</h5>
                    <form action="<?php echo base_url().'register/pay'; ?>" method="post" class="form-signin">
                        <div class="form-label-group">
                            <label for="name">Name <span style="color: #FF0000">*</span></label>
                            <input type="text" name="name" id="name" class="form-control" placeholder="Name"  required >
                        </div> <br/>
                        <div class="form-label-group">
                            <label for="email">Email <span style="color: #FF0000">*</span></label>
                            <input type="text" name="email" id="email" class="form-control" placeholder="Email address" required>
                        </div> <br/>
                        <label for="contact">Contact <span style="color: #FF0000">*</span></label>
                        <div class="form-label-group">
                            <input type="text" id="contact" name="contact" class="form-control" placeholder="Contact" required>
                        </div><br/>

					<label for="subject">Amount <span style="color: #FF0000">*</span></label>
                        <div class="form-label-group">
                            <input type="text" id="amount" name="amount" value="10" readonly class="form-control" placeholder="Amount" required>
                        </div><br/>
                       <br/>
                        <button type="submit" name="sendMailBtn" class="btn btn-lg btn-primary btn-block text-uppercase" >Pay Now</button>
                    </form>
                </div>
            </div>
        </div>
    </div>
</div>
</body>
</html>
rezorpay.php
<button id="rzp-button1" style="display:none;">Pay with Razorpay</button>
<script src="https://checkout.razorpay.com/v1/checkout.js"></script>
 <script type="text/javascript" src="https://cdnjs.cloudflare.com/ajax/libs/jquery/3.4.1/jquery.slim.min.js"></script>
<form name='razorpayform' action="<?php echo base_url().'register/verify';?>" method="POST">
    <input type="hidden" name="razorpay_payment_id" id="razorpay_payment_id">
    <input type="hidden" name="razorpay_signature"  id="razorpay_signature" >
</form>
<script>
// Checkout details as a json
var options = <?php echo json_encode($data);?>;

/**
 * The entire list of Checkout fields is available at
 * https://docs.razorpay.com/docs/checkout-form#checkout-fields
 */
options.handler = function (response){
    document.getElementById('razorpay_payment_id').value = response.razorpay_payment_id;
    document.getElementById('razorpay_signature').value = response.razorpay_signature;
    document.razorpayform.submit();
};

// Boolean whether to show image inside a white frame. (default: true)
options.theme.image_padding = false;

options.modal = {
    ondismiss: function() {
        console.log("This code runs when the popup is closed");
    },
    // Boolean indicating whether pressing escape key
    // should close the checkout form. (default: true)
    escape: true,
    // Boolean indicating whether clicking translucent blank
    // space outside checkout form should close the form. (default: false)
    backdropclose: false
};

var rzp = new Razorpay(options);

$(document).ready(function(){
	$("#rzp-button1").click();
	 rzp.open();
    e.preventDefault();
});
</script>
Step 3: Run the code
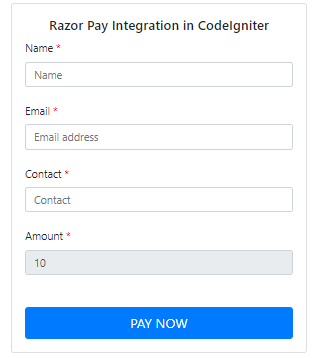
Now the final step is to run the code. For this navigate to your project folder via localhost. If you see the following screen view then congratulations.

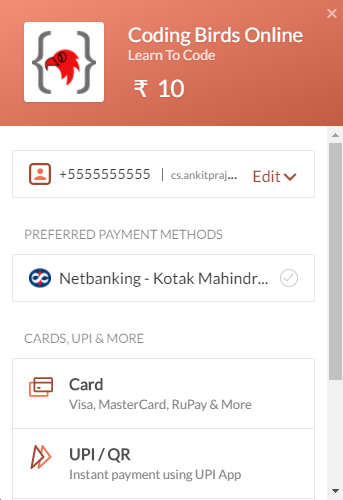
This is just a dummy payment amount, the actual payment you will calculate by your logic. Anyways fill the form and submit it. Now you will a payment screen itself provided by Razorpay and defined its view in the “Application/views/razorpay.php” file.

Now, this is a dummy payment view, you can make payment by any method you want. In my example, I just selected net banking, click next

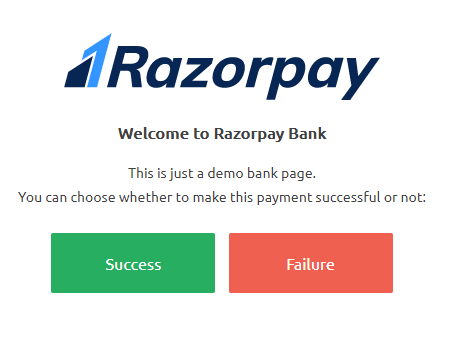
As I already told you that this is a fake payment, so just click on the success button. After that, you will be redirected to a payment success page.

Source Code & Demo
You can download the full 100% working source code from here.
Conclusion
I hope you learned and understood the Razorpay payment gateway setup explained above, If you have any suggestions, are appreciated. And if you have any errors comment here, I will help. You can download the full 100% working source code from here.
Thanks for reading this article, see you in the next post. If this code works for you, please leave a comment so that others can find code useful.
Happy Coding 🙂


11 Comments
You have very clear and practical approach which helps people to understand this types of Critical topics easily…keep growing and making such valuable content!!
Thanks for your kind feedback. Keep visiting 🙂
Thanks for the documentation.it’s very useful and helpful..can you please how can I store payment type like upi,netbanking etc? and once again thanks
I have an error Unable to load the requested file: rezorpay.php, when clicking the pay now button, and URL is https://www.xxxxxxx.com/register/pay
Hi, Documentation is very clear and Easy to Understand, but i can’t save the data,,
In setRegistrationData Function Post Form data is not getting.. I can’t fetch and save the data..pls help me to solve this issue
You need to write query to save the data. I just left with placeholder
Wow ! Amazing information showing through your blog, it’s a beautiful decoration things.Thanks for sharing.
The article was absolutely fantastic! Lot of great information which can be helpful in some or the other way. Keep updating the blog, looking forward for more contents.
by cloudi5
How to Code run? Razorpay
Message: CI_SessionWrapper::__construct(): Argument #1 ($driver) must be of type CI_Session_driver_interface, CI_Session_files_driver given, called in E:\xampp\htdocs\MLM\system\libraries\Session\Session.php on line 107
Filename: E:\xampp\htdocs\MLM\system\libraries\Session\PHP8SessionWrapper.php
This error occured what i do now?
Form data can’t handle invalid submission