Author

Ankit Kumar

Browsing

If you are looking to learn how to create CRUD application in PHP then you are in the right place. In a web application, 4 operations are mainly performed, Create, Read, Update and Delete. These are called CRUD operations in short.

  • Create – This is to save the data to the database.
  • Read – This is the operation to read or display the saved data from the database.
  • Update – This is to update the existing records in a database.
  • Delete – Last but not least, this is used to perform delete operation in the database.

Each operation has its own query syntax to perform its task. Let’s take a look at each query and we will understand its concepts.

Check this also how to submit form data using AJAX in PHP to learn to perform a single CRUD operation that is to create without page refresh. You check this demo also.

Ultimately we perform CRUD operation in any complex web application or website by different techniques and methods.

Today, I am very happy to share with you CRUD application in PHP using jQuery AJAX from scratch. But today I will show you a very simple way to CRUD using a bootstrap popup model.

How to do that?

In this tutorial, I will use a bootstrap popup model in which I will place a registration form asking to fill name, email, and contact.

After that, I will fetch the records from the database and display them without page refresh that’s why we are using AJAX.

Resources to perform CRUD operations

  • It is mandatory to use jQuery library to use AJAX functionality.
  • Here I will use a popup model on the click of the add button so that we can do this without a page refresh, That’s why we need bootstrap also. This will be good for styling purposes too.
  • That’s enough!

Lets first see the files and folder structure we are going to create for CRUD application in PHP using jQuery AJAX.
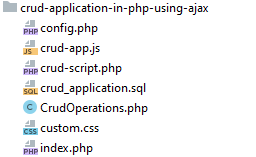
crud-application-in-php-using-jquery-ajax-coding-birds-online-files-and-folder-structure

Let’s understand the task of these files. Each file has its own task.

  • config.php is the connection file to the database.
  • crud-app.js is a javaScript file responsible to make AJAX call to accomplish not to page refresh.
  • crud-script.php has the logics of CRUD means to create, read, delete and update.
  • CrudOprations.php is a PHP class that has user-defined functions. Since we are going to use the OOPs methodology.
  • custom.css is CSS file to just to style something nothing else.
  • finally, index.php is the main file on which everything is to be performed.

crud_applications.sql is just an SQL file which is a database table. The table has this structure and you to create this in your database.

crud-application-in-php-using-jquery-ajax-coding-birds-online-table-structure

Don’t worry, I will provide the SQL file, Source code link is at the end of this post. Please include these CDN in the head tag of your index.php file.

<link rel="shortcut icon" href="https://demo.codingbirdsonline.com/website/img/coding-birds-online/coding-birds-online-favicon.png">
    <link rel="stylesheet" href="https://maxcdn.bootstrapcdn.com/bootstrap/3.4.1/css/bootstrap.min.css">
    <link rel="stylesheet" href="https://stackpath.bootstrapcdn.com/font-awesome/4.7.0/css/font-awesome.min.css"/>

and these JavaScript files to the footer means above the body tag in the index.php.

<script src="https://ajax.googleapis.com/ajax/libs/jquery/3.4.1/jquery.min.js"></script>
<script src="crud-app.js"></script>
<script src="https://maxcdn.bootstrapcdn.com/bootstrap/3.4.1/js/bootstrap.min.js"></script>

complete index.php file

<!DOCTYPE html>
<html lang="en">
<head>
    <meta charset="utf-8">
    <meta http-equiv="X-UA-Compatible" content="IE=edge">
    <meta name="viewport" content="width=device-width, initial-scale=1">
    <title>CRUD Application in PHP using AJAX - Coding Birds Online</title>
    <link rel="shortcut icon" href="https://demo.codingbirdsonline.com/website/img/coding-birds-online/coding-birds-online-favicon.png">
    <link rel="stylesheet" href="https://maxcdn.bootstrapcdn.com/bootstrap/3.4.1/css/bootstrap.min.css">
    <link rel="stylesheet" href="https://stackpath.bootstrapcdn.com/font-awesome/4.7.0/css/font-awesome.min.css"/>
    <link rel="stylesheet" href="custom.css">
</head>
<body>
<div style="margin-top: 10px;"><img width="100" src="https://demo.codingbirdsonline.com/website/img/coding-birds-online/coding-birds-online-favicon.png" class="center-block"/></div>
<div class="container">
    <h3>Delete multiple records from database using PHP </h3>
    <a href="javaScript:void(0);" data-toggle="modal" data-target="#myModal" class="btn btn-primary pull-right bottom-gap">Add New <i class="fa fa-plus" aria-hidden="true"></i></a>
    <table class="table table-bordered">
        <thead id="thead" style="background-color:#135361">
            <tr>
                <th>Sr.No</th>
                <th>Name</th>
                <th>Email</th>
                <th>Contact</th>
                <th>Action</th>
            </tr>
        </thead>
        <tbody id="crudData"></tbody>
    </table>
</div>
<div class="modal fade" id="myModal" role="dialog">
    <div class="modal-dialog">
        <div class="modal-content">
            <div class="modal-header">
                <button type="button" class="close" data-dismiss="modal">×</button>
                <h4 class="modal-title">CRUD Application Form</h4>
            </div>
            <div class="modal-body">
                <form id="crudAppForm">
                   <div class="row">
                       <div class="col-md-4">
                           <div class="form-group">
                               <label for="name">Name <span class="field-required">*</span></label>
                               <input type="text" name="name" id="name" placeholder="Name" class="form-control">
                           </div>
                       </div>
                       <div class="col-md-4">
                           <div class="form-group">
                               <label for="email">Email <span class="field-required">*</span></label>
                               <input type="text" name="email" id="email" placeholder="Email" class="form-control">
                           </div>
                       </div>
                       <div class="col-md-4">
                           <div class="form-group">
                               <label for="contact">Contact <span class="field-required">*</span></label>
                               <input type="text" name="contact" id="contact" placeholder="Contact" class="form-control">
                           </div>
                       </div>
                   </div>
                    <div class="row">
                        <div class="col-md-4">
                            <input type="hidden" name="editId" id="editId" value="" />
                            <button type="submit" name="submitBtn" id="submitBtn" class="btn btn-primary"><i class="fa fa-spinner fa-spin" id="spinnerLoader" ></i> <span id="buttonLabel">Save</span> </button>
                        </div>
                    </div>
                </form>
            </div>
            <div class="modal-footer">
                <button type="button" class="btn btn-default" data-dismiss="modal">Close</button>
            </div>
        </div>
    </div>
</div>

<script src="https://ajax.googleapis.com/ajax/libs/jquery/3.4.1/jquery.min.js"></script>
<script src="crud-app.js"></script>
<script src="https://maxcdn.bootstrapcdn.com/bootstrap/3.4.1/js/bootstrap.min.js"></script>
</body>
</html>

crud-app.js file

$( document ).ready(function() {
    getAllData();
    console.log( "ready!" );
});
$("form#crudAppForm").on("submit",function (e) {
    e.preventDefault();
    var name = $("#name").val();
    var email = $("#email").val();
    var contact = $("#contact").val();
    var editId = $("#editId").val();
    if (name == ""){
        alert("Please enter name");
        $("#name").focus();
    }else if (email == "") {
        alert("Please enter email");
        $("#email").focus();
    }else if (contact == "") {
        alert("Please enter contact");
        $("#contact").focus();
    }else{
        $("#buttonLabel").html("Saving...");
        $("#spinnerLoader").show('fast');
        $.post("crud-script.php",{
            crudOperation:"saveData",
            name:name,
            email:email,
            contact:contact,
            editId:editId,
        },function (response) {
            if (response == "saved") {
                $("#buttonLabel").html("Save");
                $("#spinnerLoader").hide('fast');
                $("#myModal").modal('hide');
                $("form#crudAppForm").each(function () {
                    this.reset();
                });
                getAllData();
            }
        });
    }
});

function getAllData() {
    $.post("crud-script.php",{crudOperation:"getData"},function (allData) {
        $("#crudData").html(allData);
    });
}

function editData(editId,name,email,contact) {
    $("#editId").val(editId);
    $("#name").val(name);
    $("#email").val(email);
    $("#contact").val(contact);
    $("#myModal").modal('show');
}

function deleteData(deleteId) {
    if(confirm("Are you sure to delete this ?")){
        $('#deleteSpinner'+deleteId).show('fast');
        $.post("crud-script.php",{crudOperation:"deleteData",deleteId:deleteId},function (response) {
            if (response == "deleted") {
                $('#deleteSpinner'+deleteId).hide('fast');
                getAllData();
            }
        });
    }
}

crud-script.php file

<?php
include "config.php";
include_once "CrudOperations.php";
$crudObj = new CrudOperations();
if ($_POST['crudOperation'] == "saveData") {
    $name = $_POST['name'];
    $email = $_POST['email'];
    $contact = $_POST['contact'];
    $editId = $_POST['editId'];
    $save = $crudObj->saveData($connection,$name,$email,$contact,$editId);
    if ($save){
        echo "saved";
    }
}

if ($_POST['crudOperation'] == "getData") {
    $sr = 1;
    $tableData = '';
    $allData = $crudObj->getAllData($connection);
    if ($allData->num_rows>0) {
        while ($row = $allData->fetch_object()) {
            $tableData .= ' <tr>
                <td>'.$sr.'</td>
                <td>'.$row->name.'</td>
                <td>'.$row->email.'</td>
                <td>'.$row->contact.'</td>
                <td><a href="javaScript:void(0)" onclick="editData(\''.$row->id.'\',\''.$row->name.'\',\''.$row->email.'\',\''.$row->contact.'\');" class="btn btn-success btn-sm">Edit <i class="fa fa-pencil-square-o"></i></a>
                <a href="javaScript:void(0)" onclick="deleteData(\''.$row->id.'\');" class="btn btn-danger btn-sm">Delete <i class="fa fa-trash-o"></i></a>
                <i class="fa fa-spinner fa-spin" id="deleteSpinner'.$row->id.'" style="color: #ff195a;display: none"></i></td>
            </tr>';
            $sr++;
        }
    }
    echo $tableData;
}

if ($_POST['crudOperation'] == "deleteData"){
    $deleteId = $_POST['deleteId'];
    $delete = $crudObj->deleteData($connection,$deleteId);
    if ($delete){
        echo "deleted";
    }
}

config.php file

<?php
$connection = new mysqli("localhost","root","","codingbirds");
if (! $connection){
    die("Error in connection".$connection->connect_error);
}

CrudOperations.php file

<?php
class CrudOperations
{
    public function saveData($connection,$name,$email,$contact,$editId)
    {
        if ($editId == "") {
            $query = "INSERT INTO crud_application SET name='$name',email='$email',contact='$contact'";
        }else{
            $query = "UPDATE crud_application SET name='$name',email='$email',contact='$contact' WHERE id='$editId'";
        }
        $result = $connection->query($query) or die("Error in saving data".$connection->error);
        return $result;
    }

    public function getAllData($connection)
    {
        $query = "SELECT * FROM crud_application";
        $result = $connection->query($query) or die("Error in getting data".$connection->error);
        return $result;
    }

    public function deleteData($connection,$deleteId){
        $query = "DELETE FROM crud_application WHERE id='$deleteId'";
        $result = $connection->query($query) or die("Error in deleting data".$connection->error);
        return $result;
    }
}

custom.css

#thead>tr>th{ color: white; }
.center-block {
    display: block;
    margin-left: auto;
    margin-right: auto;
}
.bottom-gap{
    margin-bottom: 10px;
}

.field-required,.delete-spinner{
    color: red;
}
#spinnerLoader{
    display: none;
}

Run the Code!

Now if you run the code, if there are not any errors you will get something like this.
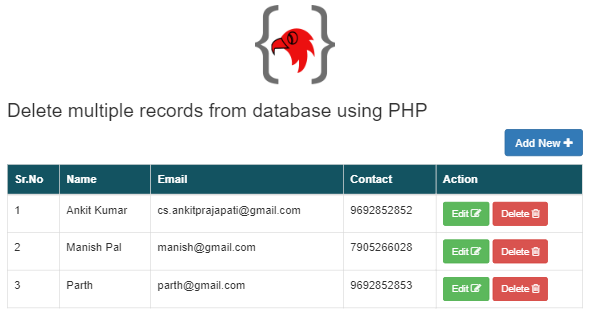
crud-application-in-php-using-jquery-ajax-coding-birds-online-crud-applications-demo

When you will submit this form you will the complete final output like this. And if you click on the Add New+ button this popup form will have appeared.
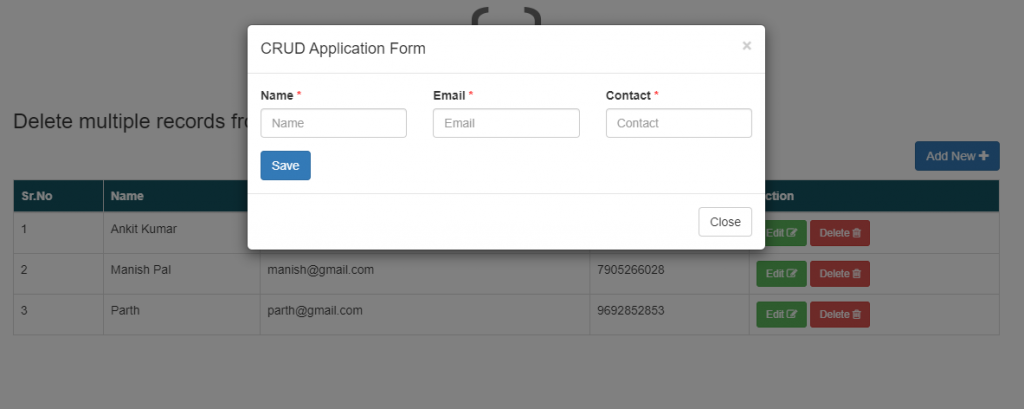
crud-application-in-php-using-jquery-ajax-coding-birds-online-crud-add-data-example

If you submit this form filling the asked values then the record will be displayed. And to inform you, everything will be on the same page without any reload. Again if you click on the edit button then the same bootstrap popup will appear with the values which you filled previously.

If you update the values then it will call ajax request, update them to the database and display again to the table.

So if you want to delete you can do it also. It will ask you “Are you sure to delete this ?”. If you confirm this then it will be deleted.

Source Code & Demo

You can download the full 100% working source code from here. You check this demo also.

Conclusion

I hope you learned explained above, If you have any suggestions, are appreciated. And if you have any errors comment here. You can download the full 100% working source code from here.

Ok, Thanks for reading this article, see you in the next post.

Happy Coding 🙂

Most of the time of want to download the desired folder from GitHub repository but not complete repo. So this post is for you if you are looking for the same. In this article, you will learn how to clone a specific folder from a git.

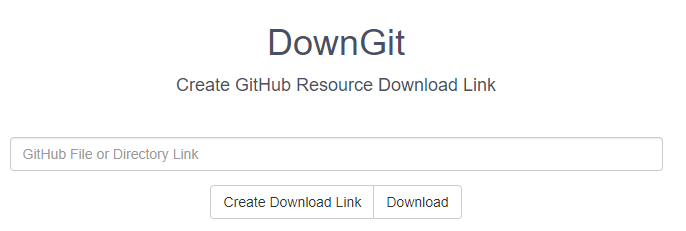
You will be happy to know that this article is not going to be Technical any more. You just need to copy the path of the file/folder of the repository from GitHub and paste it to the input box and click the download button that’s it.

So without wasting much time lets come into the steps to follow.

  • Head over to Google Search Box and type downgit.
  • Click on the first link. You can directly go to this website.
  • Now copy the path of a specific file/folder from the git repository.
  • And paste this path to the input box and hit the download button.
  • You will get a zip file in return.
  • That’s it !!!

If you have checked this article on searchable select dropdown with country flag. Then you might want to download all the flags of countries that are in the folder of a GitHub repository.

So the complete path is: https://github.com/codingbirdsonline/codingbirds_/tree/master/how-to-make-searchable-select-dropdown/flags

When you will open that website, copy this path and paste it the box looking like this. So this is website looks like you are looking for, how to clone a specific folder from a git.

how-to-clone-a-specific-folder-from-a-git-repository-website-coding-birds-online

Conclusion

I hope you learned explained above, If you have any suggestions, are appreciated. And if you have any errors comment here.

Ok, Thanks for reading this article, see you in the next post.

Happy Coding 🙂

Scrolling a big list of countries, states or cities is annoying sometimes when you are filling a form asking your country to select. Today I come up with a solution to make a searchable drop-down list, very happy to share it with you :).

Today in this tutorial I will tell you how to make a searchable drop-down list in HTML, CSS. You can create a static dropdown but I am creating it to dynamic. Check this demo.

Problem

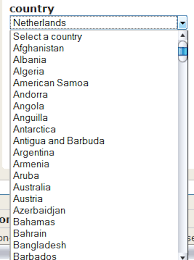
As you know the problem, that’s why you are here for the solution. LOL…, So the problem is this, suppose you have created a form in your website or web application, you have a long dropdown list to select it as you might have seen on a variety of websites. You need to scroll it until you did not find the item you are looking for.

coding-birds-online-how-to-make-a-searchable-drop-down-list-problem

Solution

The solution is select2. Select2 is a jQuery based replacement for select boxes. It supports searching remote data sets and infinite scrolling of results.

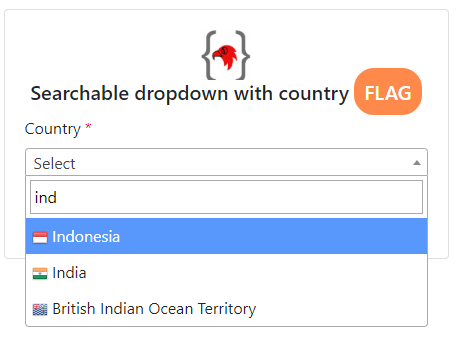
When you will integrate this, you will get a search box at the top of the select dropdown list. Now you can search the item you are looking for in a long list. You can check the installation guide also on the official website.

<link href="https://cdn.jsdelivr.net/npm/select2@4.0.12/dist/css/select2.min.css" rel="stylesheet" />
    <script src="https://cdn.jsdelivr.net/npm/select2@4.0.12/dist/js/select2.min.js"></script>

Import these CDN links to the head of the HTML page and paste this shortcode to the footer to make your dropdown list searchable.

// In your Javascript (external .js resource or <script> tag)
$(document).ready(function() {
    $('.your-select-dropdown-class').select2();
});

Don’t worry I will show you how to code step by step. I am creating this select 2 dropdown list dynamic by fetching the countries from the database. Let’s check the folder structure.

Addidtionally, I will show country flags in the dropdown, to make it more beautifull and eye catchy to the users.

coding-birds-online-how-to-make-a-searchable-drop-down-list-folder-structure

Step by step to code

  • Create an index.php file to show the select dropdown list.
  • config.php is the connection file to the database.
  • flags folder contains all the flags of the countries. I will provide it.

Now create these files.

index.php complete code

<!doctype html>
<html lang="en">
<head>
    <meta charset="UTF-8">
    <meta name="viewport" content="width=device-width, user-scalable=no, initial-scale=1.0, maximum-scale=1.0, minimum-scale=1.0">
    <meta http-equiv="X-UA-Compatible" content="ie=edge">
    <link rel="icon" href="https://codingbirdsonline.com/wp-content/uploads/2019/12/cropped-coding-birds-favicon-2-1-192x192.png" type="image/x-icon">
    <link rel="stylesheet" href="https://stackpath.bootstrapcdn.com/bootstrap/4.3.1/css/bootstrap.min.css">
    <script src="https://ajax.googleapis.com/ajax/libs/jquery/3.4.1/jquery.min.js"></script>
    <link href="https://cdn.jsdelivr.net/npm/select2@4.0.12/dist/css/select2.min.css" rel="stylesheet" />
    <script src="https://cdn.jsdelivr.net/npm/select2@4.0.12/dist/js/select2.min.js"></script>
    <title>How to make searchable dropdown with country flag - Coding Birds Online</title>
    <style>.required{color: #FF0000;}
           .flag{background-color: #ff884b;padding: 10px;border-radius: 20px;color: white}
    </style>
</head>
<body>
<div class="container">
    <?php
    include "config.php";
    $query = "SELECT * FROM bird_searchable_dropdown";
    $countries = $connection->query($query);
    ?>
    <div class="row">
        <div class="col-sm-9 col-md-7 col-lg-5 mx-auto">
            <div class="card card-signin my-5">
                <div class="card-body">
                    <center><img width="50" src="https://codingbirdsonline.com/wp-content/uploads/2019/12/cropped-coding-birds-favicon-2-1-192x192.png"></center>
                    <h5 class="card-title text-center">Searchable dropdown with country <span class="flag">FLAG</span></h5>
                    <form>
                        <div class="form-label-group">
                            <label for="inputEmail">Country <span class="required">*</span></label>
                            <select  name="select2" id="select2" class="form-control">
                                <option value="">Select</option>
                                <?php
                                if ($countries->num_rows>0){
                                    while ($country = $countries->fetch_object()){ ?>
                                        <option value="<?php echo $country->code;?>"><?php echo $country->countryname;?></option>
                                   <?php  }
                                }
                                ?>
                            </select>
                        </div> <br/>
                        <button type="submit" name="submitBtn" id="submitBtn" class="btn btn-md btn-primary btn-block text-uppercase" >Submit</button>
                    </form>
                </div>
            </div>
        </div>
    </div>
</div>
<script type="text/javascript">
    $("#select2").select2({
        templateResult: formatState
    });
    function formatState (state) {
        if (!state.id) {
            return state.text;
        }
        var baseUrl = "flags";
        var $state = $(
            '<span><img src="' + baseUrl + '/' + state.element.value.toLowerCase() + '.png" class="img-flag" /> ' + state.text + '</span>'
        );
        return $state;
    }
</script>
</body>
</html>

config.php

<?php
$connection = new mysqli("localhost","root","","codingbirds");
if (! $connection){
    die("Error in connection".$connection->connect_error);
}

Run the Code to get the searchable drop-down list

When you run the code you will get this output as I told above in the solution.

coding-birds-online-how-to-make-a-searchable-drop-down-list-final-output

Source Code & Demo

You can download the full 100% working source code from here. You check this demo also.

Conclusion

I hope you learned explained above, If you have any suggestions, are appreciated. And if you have any errors comment here. You can download the full 100% working source code from here

Check this https://minhaskamal.github.io/DownGit/ link to download a single folder(flags folder) from a repository on GitHub.

Ok, Thanks for reading this article, see you in the next post.

Happy Coding 🙂

Form submission is very common in websites or web applications. You might have noticed this in a variety of websites and web software. If you want to learn how to submit form data using AJAX, you are in the right place. You can check this demo.

When you fill a form and hit the submit button then you might have seen that page is not refreshed or reloaded instead of it shows registration successful or your message received something like this.

And on some websites, you may have seen that when you hit the submit button the page gets reloaded and then after it shows that success or error message.

Page reloading in form submission is very annoying sometimes, irritates some users and affects user experience also.

Here you will learn to code your form submission with PHP with the feature of without page refresh. This website Coding Birds Online provides simple logic and 100% full working source code without any cost.

Resources to submit form data

In this example we will use simple HTML form, In my case, I have styled this form to look and feel beautiful. And We will use the jQuery library to call the AJAX request.

We need to use AJAX here in order to submit form data using AJAX in PHP. AJAX performs the task silently with page refresh or reloading. So without wasting any time, let’s see the files and folder structure.

coding-birds-online-how-to-submit-form-data-using-ajax-in-php-files-and-folder
  • index.php is the main file which is the simple HTML form.
  • config.php is the connection file to the database.
  • ajax-script.php is a logic file that silently saves the data to the database without page refresh.
  • green-dots.gif is the loading GIF to show processing when we submit the form.

First, see this AJAX code to perform form submission.

<script type="text/javascript">
  $("form#ajaxForm").on("submit",function (e) {
      e.preventDefault();
      var name = $("#name").val();
      var email = $("#email").val();
      var contact = $("#contact").val();
      if (name == ""){
          $("#nameError").show();
          $("#nameError").html("Please enter name");
          $("#nameError").fadeOut(4000);
          $("#name").focus();
      }else if (email == ""){
          $("#emailError").show();
          $("#emailError").html("Please enter email");
          $("#emailError").fadeOut(4000);
          $("#email").focus();
      }else if (!validateEmail(email)){
          $("#emailError").show();
          $("#emailError").html("Please enter valid email");
          $("#emailError").fadeOut(4000);
          $("#email").focus();
      }else if (contact == ""){
          $("#contactError").show();
          $("#contactError").html("Please enter contact");
          $("#contactError").fadeOut(4000);
          $("#contact").focus();
      }else if (!validatePhoneNumber(contact)){
          $("#contactError").show();
          $("#contactError").html("Please enter valid contact");
          $("#contactError").fadeOut(4000);
          $("#contact").focus();
      }else{
          $("#submitBtn").hide('fast');
          $("#loader").show('fast');
          $.ajax({
              url:"ajax-script.php",
              data:{key:"saveData",name:name,email:email,contact:contact},
              method:"POST",
              success:function (response) {
                //alert(response);
                  var data = response.split('^');
                  if (data[1] == "saved") {
                      $("#submitBtn").show('fast');
                      $("#loader").hide('fast');
                      $("#successMessage").show('fast');
                      $("#successMessage").fadeOut(5000);
                      $("form#ajaxForm").each(function () {
                          this.reset();
                      });
                  }
              }
          });
      }
  });

  /*========================================================================================
                                      VALIDATION CODE
   ========================================================================================*/
  function validateEmail(inputText) {
      var mailformat = /^\w+([\.-]?\w+)*@\w+([\.-]?\w+)*(\.\w{2,3})+$/;
      if(inputText.match(mailformat)) {
          return true;
      } else{
          return false;
      }
  }
  function validatePhoneNumber(inputtxt) {
      var phonenoPattern = /^\+?([0-9]{2})\)?[-. ]?([0-9]{4})[-. ]?([0-9]{4})$/;
      if( inputtxt.match(phonenoPattern) ) {
          return true;
      }
      else {
          return false;
      }
  }
</script>

** Don’t worry, This javaScript code is the part of index.php file. I just wanted to show you that this is the AJAX request code.

complete index.php file

<!doctype html>
<html lang="en">
<head>
    <meta charset="UTF-8">
    <meta name="viewport" content="width=device-width, user-scalable=no, initial-scale=1.0, maximum-scale=1.0, minimum-scale=1.0">
    <meta http-equiv="X-UA-Compatible" content="ie=edge">
    <link rel="icon" href="https://codingbirdsonline.com/wp-content/uploads/2019/12/cropped-coding-birds-favicon-2-1-192x192.png" type="image/x-icon">
    <link rel="stylesheet" href="https://stackpath.bootstrapcdn.com/bootstrap/4.3.1/css/bootstrap.min.css">
    <script src="https://ajax.googleapis.com/ajax/libs/jquery/3.4.1/jquery.min.js"></script>
    <title>Submit form data with AJAX - Coding Birds Online</title>
    <style> .alert-successs{background-color: #1eaf59;color: white;display: none}
            .required{color: #FF0000;}
            .error-message{font-size: 12px;color: red;display: none;}
    </style>
</head>
<body>
<div class="container">
    <div class="row">
        <div class="col-sm-9 col-md-7 col-lg-5 mx-auto">
            <div class="card card-signin my-5">
                <div class="card-body">
                    <center>
                        <img width="50 " src="https://codingbirdsonline.com/wp-content/uploads/2019/12/cropped-coding-birds-favicon-2-1-192x192.png">
                    </center>
                    <h5 class="card-title text-center">Submit form data with AJAX</h5>
                    <div class="alert alert-successs" id="successMessage">Form data is saved !</div>
                    <form id="ajaxForm">
                        <div class="form-label-group">
                            <label for="inputEmail">Name<span class="required">*</span></label>
                            <input type="text" name="name" id="name" class="form-control"  placeholder="Name" autocomplete="off">
                            <div id="nameError" class="error-message">nameError</div>
                        </div> <br/>
                        <div class="form-label-group">
                            <label for="inputEmail">Email<span class="required">*</span></label>
                            <input type="text" name="email" id="email" class="form-control"  placeholder="Email" autocomplete="off">
                            <div id="emailError" class="error-message">emailError</div>
                        </div> <br/>
                        <div class="form-label-group">
                            <label for="inputEmail">Contact<span class="required">*</span></label>
                            <input type="text" name="contact" id="contact" class="form-control"  placeholder="Contact" maxlength="10" >
                            <div id="contactError" class="error-message">contactError</div>
                        </div> <br/>
                        <button type="submit" name="submitBtn" id="submitBtn" class="btn btn-md btn-primary btn-block text-uppercase" >Submit Form</button>
                        <center><img src="green-dots.gif" id="loader" style="display: none"/></center>
                    </form>
                </div>
            </div>
        </div>
    </div>
</div>
<script type="text/javascript">
  $("form#ajaxForm").on("submit",function (e) {
      e.preventDefault();
      var name = $("#name").val();
      var email = $("#email").val();
      var contact = $("#contact").val();
      if (name == ""){
          $("#nameError").show();
          $("#nameError").html("Please enter name");
          $("#nameError").fadeOut(4000);
          $("#name").focus();
      }else if (email == ""){
          $("#emailError").show();
          $("#emailError").html("Please enter email");
          $("#emailError").fadeOut(4000);
          $("#email").focus();
      }else if (!validateEmail(email)){
          $("#emailError").show();
          $("#emailError").html("Please enter valid email");
          $("#emailError").fadeOut(4000);
          $("#email").focus();
      }else if (contact == ""){
          $("#contactError").show();
          $("#contactError").html("Please enter contact");
          $("#contactError").fadeOut(4000);
          $("#contact").focus();
      }else if (!validatePhoneNumber(contact)){
          $("#contactError").show();
          $("#contactError").html("Please enter valid contact");
          $("#contactError").fadeOut(4000);
          $("#contact").focus();
      }else{
          $("#submitBtn").hide('fast');
          $("#loader").show('fast');
          $.ajax({
              url:"ajax-script.php",
              data:{key:"saveData",name:name,email:email,contact:contact},
              method:"POST",
              success:function (response) {
                //alert(response);
                  var data = response.split('^');
                  if (data[1] == "saved") {
                      $("#submitBtn").show('fast');
                      $("#loader").hide('fast');
                      $("#successMessage").show('fast');
                      $("#successMessage").fadeOut(5000);
                      $("form#ajaxForm").each(function () {
                          this.reset();
                      });
                  }
              }
          });
      }
  });

  /*========================================================================================
                                      VALIDATION CODE
    ========================================================================================*/
  function validateEmail(inputText) {
      var mailformat = /^\w+([\.-]?\w+)*@\w+([\.-]?\w+)*(\.\w{2,3})+$/;
      if(inputText.match(mailformat)) {
          return true;
      } else{
          return false;
      }
  }

  function validatePhoneNumber(inputtxt) {
      var phonenoPattern = /^\+?([0-9]{2})\)?[-. ]?([0-9]{4})[-. ]?([0-9]{4})$/;
      if( inputtxt.match(phonenoPattern) ) {
          return true;
      }
      else {
          return false;
      }
  }
</script>
</body>
</html>

ajax-script.php

<?php
include "config.php";
if (isset($_POST['key']) == "saveData")
{
    $name = $_POST['name'];
    $email = $_POST['email'];
    $contact = $_POST['contact'];

    $query = "INSERT INTO bird_ajax_register SET name='$name',email='$email',contact='$contact'";
    $result = $connection->query($query);
    if ($result) {
        echo "status^saved";
    }
}
?>

config.php

<?php
$connection = new mysqli("localhost","root","","codingbirds");
if (! $connection){
    die("Error in connection".$connection->connect_error);
}

Run the Code

When you run this code, first you will get this output.

coding-birds-online-how-to-submit-form-data-using-ajax-in-php-output-screen

When you try to submit this form without filling it, To inform I will tell, I have created form validation. Then you will get this error message.

coding-birds-online-how-to-submit-form-data-using-ajax-in-php-error-message

If everything is fine, you fill the complete form and submit, then the submit button gets hidden, and the loading image is placed over there.

coding-birds-online-how-to-submit-form-data-using-ajax-in-php-submit-form

After this you will get a success message also at the top of the form, says this form data is saved!

coding-birds-online-how-to-submit-form-data-using-ajax-in-php-success-message

Source Code

You can download the full 100% working source code from here.

Conclusion

I hope you learned explained above, If you have any suggestions, are appreciated. And if you have any errors comment here. You can download the full 100% working source code from here.

Ok, Thanks for reading this article, see you in the next post.

Happy Coding 🙂

If you are looking for the code to check username availability in PHP using ajax, then you are in the right place. Here I will provide the complete 100% working source code with a demo.

Username or email availability check is the most common feature used by a variety of websites and web applications. You might have seen this feature on most of the websites when you signup or fill a registration form.

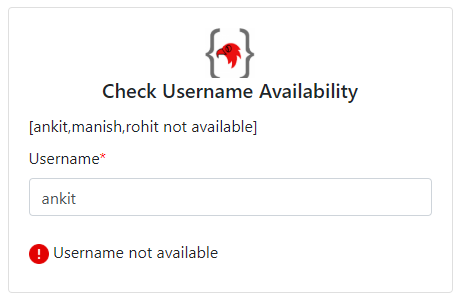
Here I will show you an example so that you can understand more. This is a simple form accepts the username. When you type the username in the input box then it automatically searches in the database whether this username already exists or not without page refresh or page reload.

If the username already exists then it will give an error message or success message and vice-versa.

Files and Folder structure

check-username-availability-in-php-using-ajax-coding-birds-onlie-file-and-folders

There are 3 main files index.php,config.php and availability-check-script.php. These files are output file, connection file, and availability check logic file respectively. Others are just icons to show loading, error and success messages.

I will call onchange function of javaScript, which will receive the entered text in the input box and make an AJAX call to validate this username already exists or not.

<input type="text" name="username" id="username" class="form-control" onkeyup="checkUsernameAvailablity();" placeholder="Start typing username" autocomplete="off" required>

When defining this function, It will be like this.

<script type="text/javascript">
    function checkUsernameAvailablity() {
        var username = $("#username").val();
        if (username !="") {
            $("#usernameAvailabilityLoader").show();
            $.post("availability-check-script.php",{key:"usernameCheck",username:username},function (response) {
                var data = response.split('^');
                if (data[1] == "available"){
                    $("#usernameAvailableLabel").show();
                    $("#usernameNotAvailableLabel").hide();
                }else if (data[1] == "notAvailable"){
                    $("#usernameNotAvailableLabel").show();
                    $("#usernameAvailableLabel").hide();
                }
                $("#usernameAvailabilityLoader").hide();
            });
        }else{
            $("#usernameAvailabilityLoader").hide();
            $("#usernameAvailableLabel").hide();
            $("#usernameNotAvailableLabel").hide();
        }
    }
</script>

Complete Code

index.php

<!doctype html>
<html lang="en">
<head>
    <meta charset="UTF-8">
    <meta name="viewport" content="width=device-width, user-scalable=no, initial-scale=1.0, maximum-scale=1.0, minimum-scale=1.0">
    <meta http-equiv="X-UA-Compatible" content="ie=edge">
    <link rel="icon" href="https://codingbirdsonline.com/wp-content/uploads/2019/12/cropped-coding-birds-favicon-2-1-192x192.png" type="image/x-icon">
    <link rel="stylesheet" href="https://stackpath.bootstrapcdn.com/bootstrap/4.3.1/css/bootstrap.min.css">
    <script src="https://ajax.googleapis.com/ajax/libs/jquery/3.4.1/jquery.min.js"></script>
    <title>Check username availability in php using ajax - Coding Birds Online</title>
</head>
<body>
<div class="container">
    <div class="row">
        <div class="col-sm-9 col-md-7 col-lg-5 mx-auto">
            <div class="card card-signin my-5">
                <div class="card-body">
                    <center>
                        <img width="50 " src="https://codingbirdsonline.com/wp-content/uploads/2019/12/cropped-coding-birds-favicon-2-1-192x192.png">
                    </center>
                    <h5 class="card-title text-center">Check Username Availability</h5>
                    <label>[ankit,manish,rohit not available]</label>
                    <form id="checkingForm" class="form-signin">
                        <div class="form-label-group">
                            <label for="inputEmail">Username<span style="color: #FF0000">*</span></label>
                            <input type="text" name="username" id="username" class="form-control" onkeyup="checkUsernameAvailablity();" placeholder="Start typing username" autocomplete="off" required>
                        </div> <br/>
                        <div class="form-label-group" id="usernameAvailabilityLoader" style="display: none">
                            <img src="loading-icon.gif"/>  <label for="inputEmail">Please Wait a moment...</label>
                        </div>
                        <div class="form-label-group" id="usernameAvailableLabel" style="display: none">
                            <img src="success-icon.png" width="20"/>  <label for="inputEmail">Username available</label>
                        </div>
                        <div class="form-label-group" id="usernameNotAvailableLabel" style="display: none">
                            <img src="error-icon.png" width="20"/>  <label for="inputEmail">Username not available </label>
                        </div>
                    </form>
                </div>
            </div>
        </div>
    </div>
</div>
<script type="text/javascript">
    function checkUsernameAvailablity() {
        var username = $("#username").val();
        if (username !="") {
            $("#usernameAvailabilityLoader").show();
            $.post("availability-check-script.php",{key:"usernameCheck",username:username},function (response) {
                var data = response.split('^');
                if (data[1] == "available"){
                    $("#usernameAvailableLabel").show();
                    $("#usernameNotAvailableLabel").hide();
                }else if (data[1] == "notAvailable"){
                    $("#usernameNotAvailableLabel").show();
                    $("#usernameAvailableLabel").hide();
                }
                $("#usernameAvailabilityLoader").hide();
            });
        }else{
            $("#usernameAvailabilityLoader").hide();
            $("#usernameAvailableLabel").hide();
            $("#usernameNotAvailableLabel").hide();
        }
    }
</script>
</body>
</html>

Run this Code

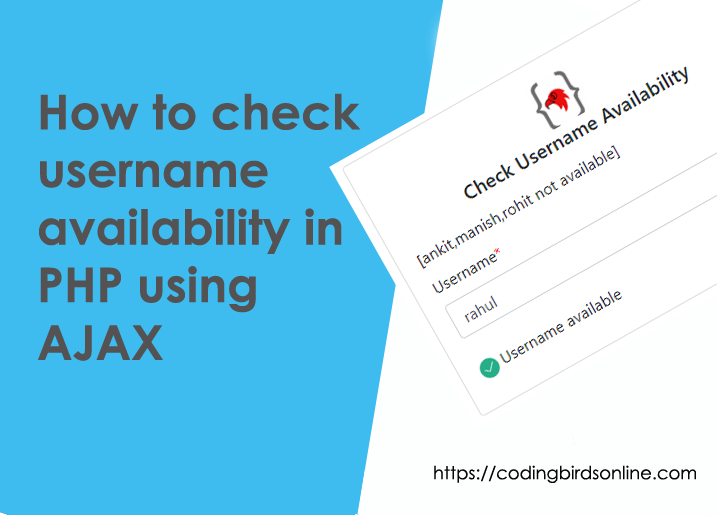
When you run this code you will get the following output if there are no errors. When you type any username in the box, then it will show the loader.

check-username-availability-in-php-using-ajax-coding-birds-onlie-checking-username

If the username is already exited it will show like this.

check-username-availability-in-php-using-ajax-coding-birds-onlie-username-not-available

And when username available means it does not exist already, then you will see this.

check-username-availability-in-php-using-ajax-coding-birds-onlie-username-is-available

Source Code & Demo

You can download the full 100% working source code from here. You check this demo also.

Conclusion

I hope you learned explained above, If you have any suggestions, are appreciated. And if you have any errors comment here. You can download the full 100% working source code from here.

Ok, Thanks for reading this article, see you in the next post.

Happy Coding 🙂

The pie chart is the most important part of data visualization. If you are looking for the code to draw the dynamic pie chart according to your data then you are in the right place.

Our website Coding Birds Online provides the very simple, to the point and 100% working source code with a complete guide. You can check this demo also.

What is a pie chart?

A pie chart (or a circle chart) is a circular statistical graphic, which is divided into slices to illustrate numerical proportions. In a pie chart, the arc length of each slice (and consequently its central angle and area), is proportional to the quantity it represents. You can read more about this chart from here.

coding-birds-online-what-is-pie-chart-exmple-image

Why it is used?

If you are using a web application or website or any report generation software then you might have noticed this feature. Graphical or visual representation of data is usually a requirement for this software.

For example, You are using an ERP system of any college you might have seen your attendance in pie chart. If you are making any software for attendance management, then it will be a great feature to that.

Starting to Code 🙂

Sounds interesting? I know surely you are. Now that’s enough to understand. So what are you waiting for? let’s get started. Visit highcharts.com for reference. If you click on this link, it will give you the same code but with static data.

  • Create an HTML page (index.php) to display the pie chart
  • Get the required imports like JavaScripts to draw a pie chart
  • Paste these imports to the head tag of the index file.
  • Paste the javaScript code above the closing tag of the body.

These are the required imports to create a dynamic pie chart.

 <script src="https://code.highcharts.com/highcharts.js"></script>
 <script src="https://code.highcharts.com/modules/exporting.js"></script>
 <script src="https://code.highcharts.com/modules/export-data.js"></script>
 <script src="https://code.highcharts.com/modules/accessibility.js"></script>

Step 1: Create index.php file

index.php

<!doctype html>
<html lang="en">
<head>
    <meta charset="UTF-8">
    <meta name="viewport" content="width=device-width, user-scalable=no, initial-scale=1.0, maximum-scale=1.0, minimum-scale=1.0">
    <meta http-equiv="X-UA-Compatible" content="ie=edge">
    <link rel="icon" href="https://codingbirdsonline.com/wp-content/uploads/2019/12/cropped-coding-birds-favicon-2-1-192x192.png" type="image/x-icon">
    <script src="https://code.highcharts.com/highcharts.js"></script>
    <script src="https://code.highcharts.com/modules/exporting.js"></script>
    <script src="https://code.highcharts.com/modules/export-data.js"></script>
    <script src="https://code.highcharts.com/modules/accessibility.js"></script>
    <title>How to create dynamic pie chart - Coding Birds Online</title>
    <style> .center-block { display: block;margin-left: auto;margin-right: auto; }</style>
</head>
<body>
<div class="container">
    <center>
        <div id="container"></div>
    </center>
    <img class="center-block" src="https://codingbirdsonline.com/wp-content/uploads/2019/12/cropped-coding-birds-favicon-2-1-192x192.png" width="50">
 </div>
<?php
include "config.php"; // connection file with database
$query = "SELECT * FROM bird_pie_chart"; // get the records on which pie chart is to be drawn
$getData = $connection->query($query);
?>
<script>
    // Build the chart
    Highcharts.chart('container', {
        chart: {
            plotBackgroundColor: null,
            plotBorderWidth: null,
            plotShadow: false,
            type: 'pie'
        },
        title: {
            text: 'Programming Language Popularity, 2020'
        },
        tooltip: {
            pointFormat: '{series.name}: <b>{point.percentage:.1f}%</b>'
        },
        accessibility: {
            point: {
                valueSuffix: '%'
            }
        },
        plotOptions: {
            pie: {
                allowPointSelect: true,
                cursor: 'pointer',
                dataLabels: {
                    enabled: false
                },
                showInLegend: true
            }
        },
        series: [{
            name: 'Popularity',
            colorByPoint: true,
            data: [
                <?php
                $data = '';
                if ($getData->num_rows>0){
                    while ($row = $getData->fetch_object()){
                        $data.='{ name:"'.$row->programming.'",y:'.$row->popularity.'},';
                    }
                }
                echo $data;
                ?>
            ]
        }]
    });
</script>
</body>
</html>

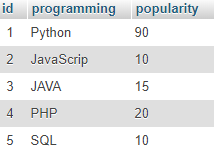
In this file, I am including a config.php, which is a connection file to the database. I am fetching records from the bird_pie_chart table. Don’t worry, I will provide the complete source code. The following is the database table structure.

coding-birds-online-table-structure

In this example, I am showing you a comparison of programming languages, with dummy data. This is now the actual data. You can customize this code and database table according to your needs.

Step 2: Run the code to get the desired output !!! That’s it.

Output

when you run the code and make sure everything is fine, then you will get the same output as following.

how-to-make-a-dynamic-pie-chart-in-php-in-2-steps-sample-output

Source Code & Demo to make a dynamic pie chart

You can download the full 100% working source code from here. You check this demo also.

Conclusion

I hope you learned explained above, If you have any suggestions, are appreciated. And if you have any errors comment here. You can download the full 100% working source code from here.

Happy Coding 🙂

Hi, If you are looking to give a dynamic search feature to your web application or your web project, without any problems, then you are in the right place.

This website Coding Birds Online provides the very simple, to the point and 100% working source code with a complete guide. You can check this demo also.

What is the DataTables plugin?

DataTable is a plug-in for the jQuery JavaScript library. It is a highly flexible tool, built upon the foundations of progressive enhancement, that adds all of these advanced features to any HTML table. You can read more about DataTable from the official website.

Not understood? Don’t worry, I will explain. In simple words. It is a simple plugin or tool we can say, that helps us to search the records in a larger table with very little time and without page refresh.

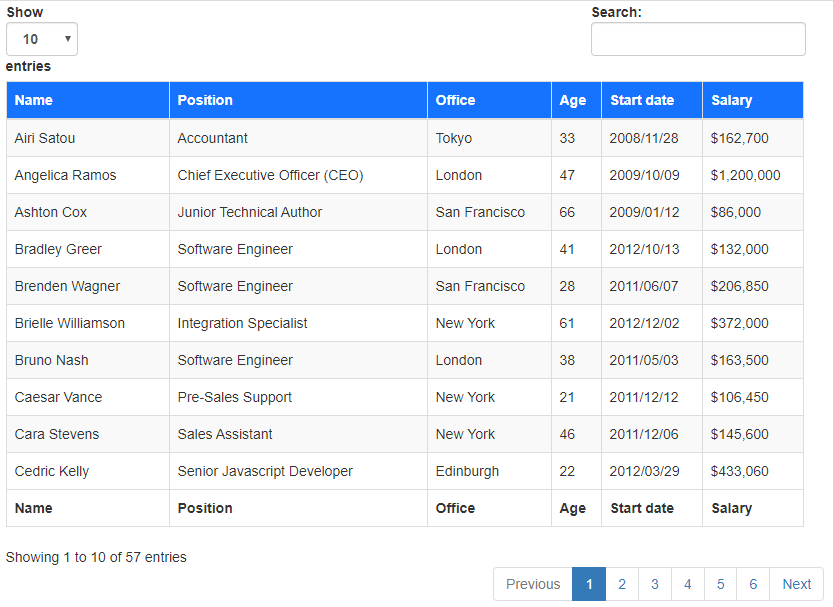
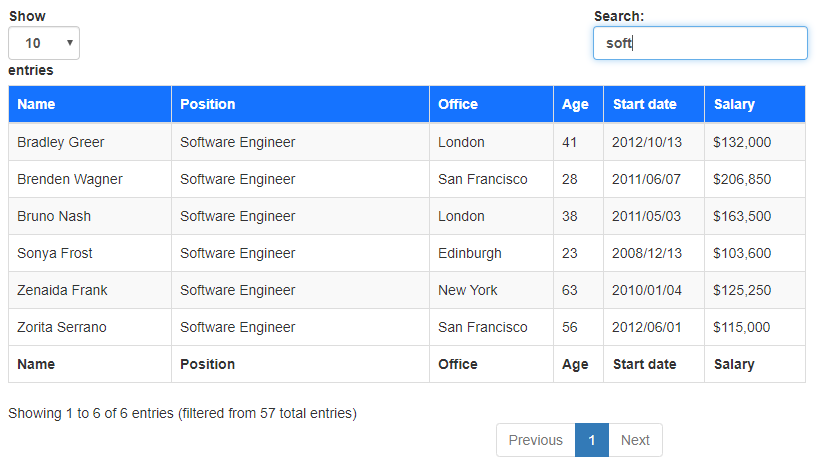
For example, check this screenshot when type any keyword in the search box, the results are dynamically displayed.

coding-birds-online-how-to-integrate-data-table-plugin-in-html-and-css-output-on-search

Why we need DataTables?

If you are using a web application, then you might have a reporting feature. You can learn how to export records. Sometimes you want to search any data in the table, if normally you code then you search a keyword in the search box, the page will be reloaded and then you will get the desired record.

Sounds interesting? I know surely you are. Now that’s enough to understand. So what are you waiting for? let’s get started

Steps to integrate data table plugin

  • Load the jQuery 1st, In the head tag of index.php file.
  • Now load the required JavaScripts provided by DataTable plugin.
  • You can load bootstrap to style the tables, It is optional.
  • Create a table in the index.php file.
  • Now add a two-line of jQuery Code.
  • Test it !!!

Let’s create the index.php or index.html, You can use index.php to fetch the records from the database. Here I am creating a static table. You can learn how to fetch records in JAVA & Servlets.

Add these imports to your head tag of the page on which you want to integrate the DataTable plugin. Make sure you import it in this sequence only.

 <script src="https://code.jquery.com/jquery-3.3.1.js"></script>
 <script src="https://maxcdn.bootstrapcdn.com/bootstrap/3.4.1/js/bootstrap.min.js"></script>

 <script src="https://cdn.datatables.net/1.10.20/js/jquery.dataTables.min.js"></script>
 <script src="https://cdn.datatables.net/1.10.20/js/dataTables.bootstrap4.min.js"></script>
 <script src="https://cdn.datatables.net/1.10.20/css/dataTables.bootstrap4.min.css"></script>

Complete Code

index.php

<!DOCTYPE html>
<html lang="en">
<head>
    <title>Integrate datatable - Coding Birds Online</title>
    <meta charset="utf-8">
    <meta name="viewport" content="width=device-width, initial-scale=1">
    <link rel="stylesheet" href="https://maxcdn.bootstrapcdn.com/bootstrap/3.4.1/css/bootstrap.min.css">
    <script src="https://code.jquery.com/jquery-3.3.1.js"></script>
    <script src="https://maxcdn.bootstrapcdn.com/bootstrap/3.4.1/js/bootstrap.min.js"></script>

    <script src="https://cdn.datatables.net/1.10.20/js/jquery.dataTables.min.js"></script>
    <script src="https://cdn.datatables.net/1.10.20/js/dataTables.bootstrap4.min.js"></script>
    <script src="https://cdn.datatables.net/1.10.20/css/dataTables.bootstrap4.min.css"></script>

    <link   rel="icon" href="https://codingbirdsonline.com/wp-content/uploads/2019/12/cropped-coding-birds-favicon-2-1-192x192.png" type="image/x-icon">
    <style> #thead>tr>th{ color: white; } </style>
</head>
<body>
<div class="container">
    <table id="exampleTable" class="table table-striped table-bordered" style="width: 70%">
        <thead id="thead">
        <tr style="background-color: #1573ff">
            <th>Name</th>
            <th>Position</th>
            <th>Office</th>
            <th>Age</th>
            <th>Start date</th>
            <th>Salary</th>
        </tr>
        </thead>
        <tbody>
        <tr>
            <td>Tiger Nixon</td>
            <td>System Architect</td>
            <td>Edinburgh</td>
            <td>61</td>
            <td>2011/04/25</td>
            <td>$320,800</td>
        </tr>
        <tr>
            <td>Garrett Winters</td>
            <td>Accountant</td>
            <td>Tokyo</td>
            <td>63</td>
            <td>2011/07/25</td>
            <td>$170,750</td>
        </tr>
        <tr>
            <td>Ashton Cox</td>
            <td>Junior Technical Author</td>
            <td>San Francisco</td>
            <td>66</td>
            <td>2009/01/12</td>
            <td>$86,000</td>
        </tr>
        <tr>
            <td>Cedric Kelly</td>
            <td>Senior Javascript Developer</td>
            <td>Edinburgh</td>
            <td>22</td>
            <td>2012/03/29</td>
            <td>$433,060</td>
        </tr>
        <tr>
            <td>Airi Satou</td>
            <td>Accountant</td>
            <td>Tokyo</td>
            <td>33</td>
            <td>2008/11/28</td>
            <td>$162,700</td>
        </tr>
        <tr>
            <td>Brielle Williamson</td>
            <td>Integration Specialist</td>
            <td>New York</td>
            <td>61</td>
            <td>2012/12/02</td>
            <td>$372,000</td>
        </tr>
        <tr>
            <td>Herrod Chandler</td>
            <td>Sales Assistant</td>
            <td>San Francisco</td>
            <td>59</td>
            <td>2012/08/06</td>
            <td>$137,500</td>
        </tr>
        <tr>
            <td>Rhona Davidson</td>
            <td>Integration Specialist</td>
            <td>Tokyo</td>
            <td>55</td>
            <td>2010/10/14</td>
            <td>$327,900</td>
        </tr>
        <tr>
            <td>Colleen Hurst</td>
            <td>Javascript Developer</td>
            <td>San Francisco</td>
            <td>39</td>
            <td>2009/09/15</td>
            <td>$205,500</td>
        </tr>
        <tr>
            <td>Sonya Frost</td>
            <td>Software Engineer</td>
            <td>Edinburgh</td>
            <td>23</td>
            <td>2008/12/13</td>
            <td>$103,600</td>
        </tr>
        <tr>
            <td>Jena Gaines</td>
            <td>Office Manager</td>
            <td>London</td>
            <td>30</td>
            <td>2008/12/19</td>
            <td>$90,560</td>
        </tr>
        <tr>
            <td>Quinn Flynn</td>
            <td>Support Lead</td>
            <td>Edinburgh</td>
            <td>22</td>
            <td>2013/03/03</td>
            <td>$342,000</td>
        </tr>
        <tr>
            <td>Charde Marshall</td>
            <td>Regional Director</td>
            <td>San Francisco</td>
            <td>36</td>
            <td>2008/10/16</td>
            <td>$470,600</td>
        </tr>
        <tr>
            <td>Haley Kennedy</td>
            <td>Senior Marketing Designer</td>
            <td>London</td>
            <td>43</td>
            <td>2012/12/18</td>
            <td>$313,500</td>
        </tr>
        <tr>
            <td>Tatyana Fitzpatrick</td>
            <td>Regional Director</td>
            <td>London</td>
            <td>19</td>
            <td>2010/03/17</td>
            <td>$385,750</td>
        </tr>
        <tr>
            <td>Michael Silva</td>
            <td>Marketing Designer</td>
            <td>London</td>
            <td>66</td>
            <td>2012/11/27</td>
            <td>$198,500</td>
        </tr>
        <tr>
            <td>Paul Byrd</td>
            <td>Chief Financial Officer (CFO)</td>
            <td>New York</td>
            <td>64</td>
            <td>2010/06/09</td>
            <td>$725,000</td>
        </tr>
        <tr>
            <td>Gloria Little</td>
            <td>Systems Administrator</td>
            <td>New York</td>
            <td>59</td>
            <td>2009/04/10</td>
            <td>$237,500</td>
        </tr>
        <tr>
            <td>Bradley Greer</td>
            <td>Software Engineer</td>
            <td>London</td>
            <td>41</td>
            <td>2012/10/13</td>
            <td>$132,000</td>
        </tr>
        <tr>
            <td>Dai Rios</td>
            <td>Personnel Lead</td>
            <td>Edinburgh</td>
            <td>35</td>
            <td>2012/09/26</td>
            <td>$217,500</td>
        </tr>
        <tr>
            <td>Jenette Caldwell</td>
            <td>Development Lead</td>
            <td>New York</td>
            <td>30</td>
            <td>2011/09/03</td>
            <td>$345,000</td>
        </tr>
        <tr>
            <td>Yuri Berry</td>
            <td>Chief Marketing Officer (CMO)</td>
            <td>New York</td>
            <td>40</td>
            <td>2009/06/25</td>
            <td>$675,000</td>
        </tr>
        <tr>
            <td>Caesar Vance</td>
            <td>Pre-Sales Support</td>
            <td>New York</td>
            <td>21</td>
            <td>2011/12/12</td>
            <td>$106,450</td>
        </tr>
        <tr>
            <td>Doris Wilder</td>
            <td>Sales Assistant</td>
            <td>Sydney</td>
            <td>23</td>
            <td>2010/09/20</td>
            <td>$85,600</td>
        </tr>
        <tr>
            <td>Angelica Ramos</td>
            <td>Chief Executive Officer (CEO)</td>
            <td>London</td>
            <td>47</td>
            <td>2009/10/09</td>
            <td>$1,200,000</td>
        </tr>
        <tr>
            <td>Gavin Joyce</td>
            <td>Developer</td>
            <td>Edinburgh</td>
            <td>42</td>
            <td>2010/12/22</td>
            <td>$92,575</td>
        </tr>
        <tr>
            <td>Jennifer Chang</td>
            <td>Regional Director</td>
            <td>Singapore</td>
            <td>28</td>
            <td>2010/11/14</td>
            <td>$357,650</td>
        </tr>
        <tr>
            <td>Brenden Wagner</td>
            <td>Software Engineer</td>
            <td>San Francisco</td>
            <td>28</td>
            <td>2011/06/07</td>
            <td>$206,850</td>
        </tr>
        <tr>
            <td>Fiona Green</td>
            <td>Chief Operating Officer (COO)</td>
            <td>San Francisco</td>
            <td>48</td>
            <td>2010/03/11</td>
            <td>$850,000</td>
        </tr>
        <tr>
            <td>Shou Itou</td>
            <td>Regional Marketing</td>
            <td>Tokyo</td>
            <td>20</td>
            <td>2011/08/14</td>
            <td>$163,000</td>
        </tr>
        <tr>
            <td>Michelle House</td>
            <td>Integration Specialist</td>
            <td>Sydney</td>
            <td>37</td>
            <td>2011/06/02</td>
            <td>$95,400</td>
        </tr>
        <tr>
            <td>Suki Burks</td>
            <td>Developer</td>
            <td>London</td>
            <td>53</td>
            <td>2009/10/22</td>
            <td>$114,500</td>
        </tr>
        <tr>
            <td>Prescott Bartlett</td>
            <td>Technical Author</td>
            <td>London</td>
            <td>27</td>
            <td>2011/05/07</td>
            <td>$145,000</td>
        </tr>
        <tr>
            <td>Gavin Cortez</td>
            <td>Team Leader</td>
            <td>San Francisco</td>
            <td>22</td>
            <td>2008/10/26</td>
            <td>$235,500</td>
        </tr>
        <tr>
            <td>Martena Mccray</td>
            <td>Post-Sales support</td>
            <td>Edinburgh</td>
            <td>46</td>
            <td>2011/03/09</td>
            <td>$324,050</td>
        </tr>
        <tr>
            <td>Unity Butler</td>
            <td>Marketing Designer</td>
            <td>San Francisco</td>
            <td>47</td>
            <td>2009/12/09</td>
            <td>$85,675</td>
        </tr>
        <tr>
            <td>Howard Hatfield</td>
            <td>Office Manager</td>
            <td>San Francisco</td>
            <td>51</td>
            <td>2008/12/16</td>
            <td>$164,500</td>
        </tr>
        <tr>
            <td>Hope Fuentes</td>
            <td>Secretary</td>
            <td>San Francisco</td>
            <td>41</td>
            <td>2010/02/12</td>
            <td>$109,850</td>
        </tr>
        <tr>
            <td>Vivian Harrell</td>
            <td>Financial Controller</td>
            <td>San Francisco</td>
            <td>62</td>
            <td>2009/02/14</td>
            <td>$452,500</td>
        </tr>
        <tr>
            <td>Timothy Mooney</td>
            <td>Office Manager</td>
            <td>London</td>
            <td>37</td>
            <td>2008/12/11</td>
            <td>$136,200</td>
        </tr>
        <tr>
            <td>Jackson Bradshaw</td>
            <td>Director</td>
            <td>New York</td>
            <td>65</td>
            <td>2008/09/26</td>
            <td>$645,750</td>
        </tr>
        <tr>
            <td>Olivia Liang</td>
            <td>Support Engineer</td>
            <td>Singapore</td>
            <td>64</td>
            <td>2011/02/03</td>
            <td>$234,500</td>
        </tr>
        <tr>
            <td>Bruno Nash</td>
            <td>Software Engineer</td>
            <td>London</td>
            <td>38</td>
            <td>2011/05/03</td>
            <td>$163,500</td>
        </tr>
        <tr>
            <td>Sakura Yamamoto</td>
            <td>Support Engineer</td>
            <td>Tokyo</td>
            <td>37</td>
            <td>2009/08/19</td>
            <td>$139,575</td>
        </tr>
        <tr>
            <td>Thor Walton</td>
            <td>Developer</td>
            <td>New York</td>
            <td>61</td>
            <td>2013/08/11</td>
            <td>$98,540</td>
        </tr>
        <tr>
            <td>Finn Camacho</td>
            <td>Support Engineer</td>
            <td>San Francisco</td>
            <td>47</td>
            <td>2009/07/07</td>
            <td>$87,500</td>
        </tr>
        <tr>
            <td>Serge Baldwin</td>
            <td>Data Coordinator</td>
            <td>Singapore</td>
            <td>64</td>
            <td>2012/04/09</td>
            <td>$138,575</td>
        </tr>
        <tr>
            <td>Zenaida Frank</td>
            <td>Software Engineer</td>
            <td>New York</td>
            <td>63</td>
            <td>2010/01/04</td>
            <td>$125,250</td>
        </tr>
        <tr>
            <td>Zorita Serrano</td>
            <td>Software Engineer</td>
            <td>San Francisco</td>
            <td>56</td>
            <td>2012/06/01</td>
            <td>$115,000</td>
        </tr>
        <tr>
            <td>Jennifer Acosta</td>
            <td>Junior Javascript Developer</td>
            <td>Edinburgh</td>
            <td>43</td>
            <td>2013/02/01</td>
            <td>$75,650</td>
        </tr>
        <tr>
            <td>Cara Stevens</td>
            <td>Sales Assistant</td>
            <td>New York</td>
            <td>46</td>
            <td>2011/12/06</td>
            <td>$145,600</td>
        </tr>
        <tr>
            <td>Hermione Butler</td>
            <td>Regional Director</td>
            <td>London</td>
            <td>47</td>
            <td>2011/03/21</td>
            <td>$356,250</td>
        </tr>
        <tr>
            <td>Lael Greer</td>
            <td>Systems Administrator</td>
            <td>London</td>
            <td>21</td>
            <td>2009/02/27</td>
            <td>$103,500</td>
        </tr>
        <tr>
            <td>Jonas Alexander</td>
            <td>Developer</td>
            <td>San Francisco</td>
            <td>30</td>
            <td>2010/07/14</td>
            <td>$86,500</td>
        </tr>
        <tr>
            <td>Shad Decker</td>
            <td>Regional Director</td>
            <td>Edinburgh</td>
            <td>51</td>
            <td>2008/11/13</td>
            <td>$183,000</td>
        </tr>
        <tr>
            <td>Michael Bruce</td>
            <td>Javascript Developer</td>
            <td>Singapore</td>
            <td>29</td>
            <td>2011/06/27</td>
            <td>$183,000</td>
        </tr>
        <tr>
            <td>Donna Snider</td>
            <td>Customer Support</td>
            <td>New York</td>
            <td>27</td>
            <td>2011/01/25</td>
            <td>$112,000</td>
        </tr>
        </tbody>
        <tfoot>
        <tr>
            <th>Name</th>
            <th>Position</th>
            <th>Office</th>
            <th>Age</th>
            <th>Start date</th>
            <th>Salary</th>
        </tr>
        </tfoot>
    </table>
</div>
<script>
    $(document).ready(function() {
        $('#exampleTable').DataTable();
    } );
</script>
</body>
</html>

Final output

coding-birds-online-how-to-integrate-data-table-plugin-in-html-and-css-screen-output

Source Code with Demo

To download the full working source code download it from here. You can check this demo also.

You can also watch this video of mine, uploaded a year ago explaining the same.

Conclusion

I hope you learned everything I explained above, If you have any suggestions, are appreciated. And if you have any error comment here. If you want to download the source code then click here.

Happy Coding 🙂
Hello, beginners and coders, are you looking for the PHP script to export data from MySQL table to Excel file in PHP, then you are right place. Coding Birds Online is a website that provides 100% working source code. You can check this demo.

Importance & Need for this?

Exporting table data to excel is simply a reporting feature that every web application or web project needs it. Suppose you are using a web application that registers hundreds of employees a day. But unfortunately, you might not now, your application may crash or any bug can occur.

So it is always a good practice to give an option to export the complete detail of registred employees to the excel sheet so that we can have a backup. This is what we are going to code this feature in PHP. So what are you waiting for? let’s get started.

So here are the files and folders that you need to code this feature.

coding-birds-online-export-data-from-mysql-table-to-excel-file-in-php-files-and-folders
  • index.php file is the main file that shows the records from the database and has an export button.
  • export-table-script.php, this is the actual logic file that export data to excel file.
  • Common.php is the class file that fetches all the records from the database.
  • config.php is the connection file to the database.
  • bird_records.sql is the SQL table in the database, I will provide it.

index.php

<!DOCTYPE html>
<html lang="en">
<head>
    <title>Export table data to csv file in php - Coding Birds Online</title>
    <meta charset="utf-8">
    <meta name="viewport" content="width=device-width, initial-scale=1">
    <link rel="stylesheet" href="https://maxcdn.bootstrapcdn.com/bootstrap/3.4.1/css/bootstrap.min.css">
    <script src="https://ajax.googleapis.com/ajax/libs/jquery/3.4.1/jquery.min.js"></script>
    <script src="validation.js"></script>
    <script src="https://maxcdn.bootstrapcdn.com/bootstrap/3.4.1/js/bootstrap.min.js"></script>
    <link rel="icon" href="https://codingbirdsonline.com/wp-content/uploads/2019/12/cropped-coding-birds-favicon-2-1-192x192.png" type="image/x-icon">
    <style>
        #thead>tr>th{ color: white; }
    </style>
</head>
<body>
<div style="margin-top: 20px;padding-bottom: 20px;">
    <center>
        <img width="100" src="https://codingbirdsonline.com/wp-content/uploads/2019/12/cropped-coding-birds-favicon-2-1-192x192.png"/>
        <h3>Export table data to csv file in php</h3>
    </center>
</div>
<div class="container">
    <form action="export-table-script.php" method="post">
        <table class="table table-bordered table-condensed">
            <thead id="thead" style="background-color:#ff195a">
            <tr>
                <th>Sr.No</th>
                <th>Name</th>
                <th>Class</th>
                <th>Total Markes</th>
                <th>Gender</th>
            </tr>
            </thead>
            <tbody>
            <?php
            include "config.php";
            include_once "Common.php";
            $common = new Common();
            $records = $common->getAllRecords($connection);
            if ($records->num_rows>0){
                $sr = 1;
                while ($record = $records->fetch_object()) {
                    $recordId = $record->id;
                    $name = $record->name;
                    $class = $record->class;
                    $marks = $record->marks;
                    $gender = $record->gender;?>
                    <tr>
                        <td><?php echo $sr;?></td>
                        <td><?php echo $name;?></td>
                        <td><?php echo $class;?></td>
                        <td><?php echo $marks;?></td>
                        <td><?php echo $gender;?></td>
                    </tr>
                    <?php
                    $sr++;
                }
            }
            ?>
            </tbody>
        </table>
        <button type="submit" name="exportBtn" id="exportBtn" class="btn btn-primary"style="float: right">Export Data</button>
    </form>
</div>
</body>
</html>

export-table-script.php

<?php
include "config.php";
include_once "Common.php";
$common = new Common();
$records = $common->getAllRecords($connection);
$dataTable = '';
$dataTable .='<table class="table">
                   <thead>
                       <tr>
                            <th>Sr.No</th>
                            <th>Name</th>
                            <th>Class</th>
                            <th>Total Markes</th>
                            <th>Gender</th>
                        </tr>
                    </thead>
                    <tbody>';
    if ($records->num_rows>0) {
        $sr = 1;
        while ($record = $records->fetch_object()) {
            $recordId = $record->id;
            $name = $record->name;
            $class = $record->class;
            $marks = $record->marks;
            $gender = $record->gender;
            $dataTable .='
            <tr>
                <td>'.$sr.'</td>
                <td>'.$name.'</td>
                <td>'.$class.'</td>
                <td>'.$marks.'</td>
                <td>'.$gender.'</td>
            </tr>';

            $sr++;
        }
    }
    $dataTable .= '  </tbody>
                    </table>';
    $filename = "exported-data-".date('d-m-Y H:i:s').".xls";
    header('Content-Type: application/xls');
    header('Content-Disposition: attachment; filename='.$filename);
    echo $dataTable;

config.php

<?php
$hostName = "localhost"; // host name
$username = "root";  // database username
$password = ""; // database password
$databaseName = "codingbirds"; // database name

$connection = new mysqli($hostName,$username,$password,$databaseName);
if (!$connection) {
    die("Error in database connection". $connection->connect_error);
}
?>

Common.php

<?php
class Common
{
    public function getAllRecords($connection) {
        $query = "SELECT * FROM bird_records";
        $result = $connection->query($query) or die("Error in query1".$connection->error);
        return $result;
    }
}

If you run this code you will get following out, the main home page and exported out also.

coding-birds-online-export-data-from-mysql-table-to-excel-file-in-php-screen-output

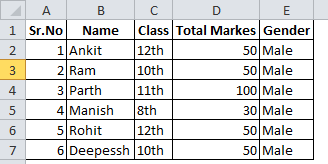
When you click the export button then the file will be download in excel format as like this.

coding-birds-online-export-data-from-mysql-table-to-excel-file-in-php-generated-output

Source Code

To download the full working source code download it from here.

Conclusion

I hope you learned everything I explained above, If you have any suggestions, are appreciated. And if you have any error comment here. If you want to download the source code then click here.

Hi, Are you looking to learn how to integrate Google re-Captcha with the easiest method, then you are in the right place. Coding Birds Online is a how-to, tutorial website which provides the easiest coding logic with full working source code. Check this demo.

What is Google re-Captcha?

reCAPTCHA is a free service provided by Google which helps to protect websites from spam and abuse. A “CAPTCHA” is a Turing test to tell humans and bots apart. It is easy for humans to solve, but hard for “bots” and other malicious software to figure out. By adding reCAPTCHA to a site, you can block automated software while helping your welcome users to enter with ease.

Why we need it?

If you have a website or web application, you might have noticed that there are some unnecessary contact, inquiry entries came from contact form of the website. These entries are not by a human, so you might think then? The answer is these are by some bots and much other malicious software.

In previous days, we used to put a random number before the form submission and ask the user to enter the same number and verify it on the server-side. But now this method is old. Google’s reCAPTCHA is a new way to verify a user, and it is very simple to verify the user. They just need a single click or tap to prove they are not a robot.

Steps to implement google ReCaptcha in PHP

We need to get the API keys by registering our site, and then Google provides site key, secret key. These keys are important to display the Google re-Captcha and another one is to verify the same.

Step 1: Get re-CAPTCHA API key

In order to get the API keys, visit the https://www.google.com/recaptcha/admin and register your website. If you open this link and login with your Google account you will get a dashboard. Now click the 3rd button displaying like +.

coding-birds-online-how-to-integrate-google-re-captcha-with-php-getting-keys-by-register

Now you will get the API keys as

coding-birds-online-how-to-integrate-google-re-captcha-with-php-keys

Step 2: Adding re-CAPTCHA to your site

Insert this code to head tag of your HTML page

 <script src='https://www.google.com/recaptcha/api.js' async defer ></script>

Step 3: Create a FORM with re-Captcha

This is the main index.php file that is your output on the screen. It uses a verify-captcha.php file to validate the Google re-Captcha. To create these files, take a look.

index.php

<!doctype html>
<html lang="en">
<head>
    <meta charset="UTF-8">
    <meta name="viewport" content="width=device-width, user-scalable=no, initial-scale=1.0, maximum-scale=1.0, minimum-scale=1.0">
    <meta http-equiv="X-UA-Compatible" content="ie=edge">
    <link rel="icon" href="https://codingbirdsonline.com/wp-content/uploads/2019/12/cropped-coding-birds-favicon-2-1-192x192.png" type="image/x-icon">
    <link rel="stylesheet" href="https://stackpath.bootstrapcdn.com/bootstrap/4.3.1/css/bootstrap.min.css">
    <link rel="stylesheet" href="https://use.fontawesome.com/releases/v5.8.2/css/all.css">
    <script src="https://ajax.googleapis.com/ajax/libs/jquery/3.4.1/jquery.min.js"></script>
    <script type="text/javascript" src="https://stackpath.bootstrapcdn.com/bootstrap/4.3.1/js/bootstrap.bundle.min.js"></script>
    <title>Google re-Captcha - Coding Birds Online</title>
    <script src='https://www.google.com/recaptcha/api.js' async defer ></script>
</head>
<body>
<div class="container">
    <div class="row">
        <div class="col-sm-9 col-md-7 col-lg-5 mx-auto">
            <div class="card card-signin my-5">
                <div class="card-body">
                    <h5 class="card-title text-center">Google re-Captcha</h5>
                    <form action="verify-captcha.php" method="post" id="reCaptchaForm" class="form-signin">
                        <div class="form-label-group">
                            <label for="inputEmail">Name<span style="color: #FF0000">*</span></label>
                            <input type="text" name="name" id="name" class="form-control" required placeholder="Name">
                        </div> <br/>
                        <div class="form-label-group">
                            <label for="inputEmail">Email<span style="color: #FF0000">*</span></label>
                            <input type="text" name="email" id="email" class="form-control" required placeholder="Email">
                        </div> <br/>
                        <div class="form-label-group">
                            <div class="g-recaptcha" data-sitekey="your_site_key">
                            </div> <br/>
                            <button type="submit" name="submitBtn" id="submitBtn" class="btn btn-lg btn-primary btn-block text-uppercase" >Verify</button>
                    </form>
                </div>
            </div>
        </div>
    </div>
</div>
</body>
</html>

verify-captcha.php

<!doctype html>
<html lang="en">
<head>
    <meta charset="UTF-8">
    <meta name="viewport" content="width=device-width, user-scalable=no, initial-scale=1.0, maximum-scale=1.0, minimum-scale=1.0">
    <meta http-equiv="X-UA-Compatible" content="ie=edge">
    <link rel="icon" href="https://codingbirdsonline.com/wp-content/uploads/2019/12/cropped-coding-birds-favicon-2-1-192x192.png" type="image/x-icon">
    <link rel="stylesheet" href="https://stackpath.bootstrapcdn.com/bootstrap/4.3.1/css/bootstrap.min.css">
    <link rel="stylesheet" href="https://use.fontawesome.com/releases/v5.8.2/css/all.css">
    <script src="https://ajax.googleapis.com/ajax/libs/jquery/3.4.1/jquery.min.js"></script>
    <script type="text/javascript" src="https://stackpath.bootstrapcdn.com/bootstrap/4.3.1/js/bootstrap.bundle.min.js"></script>
    <title>Google re-Captcha - Coding Birds Online</title>
</head>
<body>
<div class="container">
    <div class="row">
        <div class="col-sm-9 col-md-7 col-lg-5 mx-auto">
            <div class="card card-signin my-5">
                <div class="card-body">
                    <h5 class="card-title text-center">Google re-Captcha Result </h5>
                    <?php

                    if(isset($_POST['submitBtn'])) {
                        $secret = 'your_secret_key';
                        $verifyResponse = file_get_contents('https://www.google.com/recaptcha/api/siteverify?secret='.$secret.'&response='.$_POST['g-recaptcha-response']);
                        $responseData = json_decode($verifyResponse);

                        if($responseData->success)
                        {
                            echo ' <div class="alert alert-success" role="alert">
                                    Success ! Captcha Verified
                                   </div>';
                            echo $_POST['name']; echo '<br/>';
                            echo $_POST['email']; echo '<br/>';
                            echo 'Do whatever you want of this received data !';
                        }
                        else
                        {
                            echo ' <div class="alert alert-danger" role="alert">
                                        Please verify you are not robot !
                                    </div>';
                        }
                    }
                    ?>
                </div>
            </div>
        </div>
    </div>
</div>
</body>
</html>

Step 4: Test out code

When you run this code you will get the output like this. You can check this working demo also. Click to see the demo.

coding-birds-online-how-to-integrate-google-re-captcha-with-php-out-screen

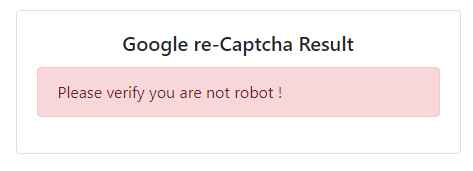
Now, these form fields are mandatory to fill. If you submit this form filling the fields without checking re-Captcha then you will get output like this.

coding-birds-online-how-to-integrate-google-re-captcha-with-php-output-failed

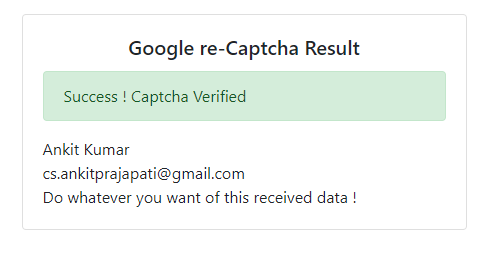
If you fill the form and verify you are not a robot, then you will see this.

coding-birds-online-how-to-integrate-google-re-captcha-with-php-output-success

Source Code

To download the full working source code download it from here.

Conclusion

I hope you learned everything I explained above, If you have any suggestions, are appreciated. And if you have any error comment here. If you want to download the source code then click here.

Hi, Are you looking for the PHP script of how to generate QR code in PHP code? then you are right place. Here I will provide the concept, and how to do this. As I think generating QR code with PHP is not complicated nor logical.

You can accomplish this task by using a plugin-play opensource PHP library. So don’t worry. Let’s take a quick introduction to what is the QR code. Check this demo.

What is QR Code?

QR code is the full form of the Quick Response Code 😂. It’s not a joke, I am saying true. You can google it. It is the 2D barcode format code it is used to store text like phone numbers, emails, address, and simple text, or anything want to store, you can.

How to generate QR code in PHP?

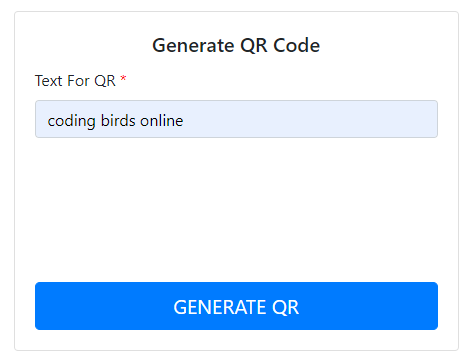
I will use a plugin-play opensource PHP library to perform this task. I will create a simple HTML form that accepts text, email, phone or any text for which you want to generate QR code. You can check this demo.

Steps to generate dynamic QR code in PHP

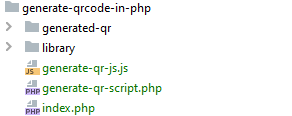
  • Create an index.php file, which is a simple HTML form to receive the text.
  • Make a generate-qr-script.php, which is a PHP script file to generate QR.
  • Create a generate-qr-js.js, which is responsible to generate dynamic QR without page reload.
  • And download the QR code library we talked above. Download it from here.
  • Finally,create a folder to save QR images. In my terms it is generated-qr.

Files and folder structure

how-to-generate-qr-code-in-php-coding-birds-online-files-and-folder-structure

Now its time to create these files, so what are you waiting for ? Let’s start

index.php

<!doctype html>
<html lang="en">
<head>
    <meta charset="UTF-8">
    <meta name="viewport" content="width=device-width, user-scalable=no, initial-scale=1.0, maximum-scale=1.0, minimum-scale=1.0">
    <meta http-equiv="X-UA-Compatible" content="ie=edge">
    <link rel="icon" href="https://codingbirdsonline.com/wp-content/uploads/2019/12/cropped-coding-birds-favicon-2-1-192x192.png" type="image/x-icon">
    <link rel="stylesheet" href="https://stackpath.bootstrapcdn.com/bootstrap/4.3.1/css/bootstrap.min.css">
    <link rel="stylesheet" href="https://use.fontawesome.com/releases/v5.8.2/css/all.css">
    <script src="https://ajax.googleapis.com/ajax/libs/jquery/3.4.1/jquery.min.js"></script>
    <script type="text/javascript" src="https://stackpath.bootstrapcdn.com/bootstrap/4.3.1/js/bootstrap.bundle.min.js"></script>
    <title>Send Email Example</title>
    <style>
        .center-block {
            display: block;
            margin-left: auto;
            margin-right: auto;
        }
    </style>
</head>
<body>
<div class="container">
    <div class="row">
        <div class="col-sm-9 col-md-7 col-lg-5 mx-auto">
            <div class="card card-signin my-5">
                <div class="card-body">
                    <h5 class="card-title text-center">Generate QR Code</h5>
                    <form id="generateQrForm" class="form-signin">
                        <div class="form-label-group">
                            <label for="inputEmail">Text For QR <span style="color: #FF0000">*</span></label>
                            <input type="text" name="qrText" id="qrText" class="form-control" required placeholder="Enter something to generate QR">
                        </div> <br/>
                       <div id="generatedQr text-center">
                            <img src="" id="generatedQrImg" class="center-block">
                        </div> <br/>
                        <button type="submit" name="generateQrBtn" id="generateQrBtn" class="btn btn-lg btn-primary btn-block text-uppercase" >Generate QR</button>
                    </form>
                </div>
            </div>
        </div>
    </div>
</div>
<script type="text/javascript" src="generate-qr-js.js"></script>
</body>
</html>

generate-qr-script.php

<?php
include "library/qrlib.php";
if (isset($_POST['generateQr']) == 'generateQr')
{
    $qrText = $_POST['qrText']; // receive the text for QR
    $directory = "generated-qr/"; // folder where to store QR
    $fileName = 'QR-'.rand().'.png'; // generate random name of QR image
    QRcode::png($qrText, $directory.$fileName, 'L', 4, 2); // library function to generate QR
    echo "success^".$directory.$fileName; // returns the qr-image path
}

generate-qr-js.js

$("form#generateQrForm").on("submit",function (e) {
    e.preventDefault();
   var qrText = $("#qrText").val();
   $.post("generate-qr-script.php",{generateQr:'generateQr',qrText:qrText},function (response) {
        var data = response.split('^');
        var generateQrImgPath = data[1];
        $("#generatedQrImg").attr("src",generateQrImgPath);
   })
});

PHP QR code library

Now you need to download the library. it is available in SourceForge. Download it from here.

Output you see

how-to-generate-qr-code-in-php-coding-birds-online-output-1

When you enter some text and hit generate QR button, you will get output like this without page reloading. I used jQuery, AJAX to make it.

how-to-generate-qr-code-in-php-coding-birds-online-output-2

Conclusion

So you learned about how to how to generate QR code with PHP using PHP library and HTML form. If you face any error comment here your problem, and if you want to download the full working source code then you can download it from here.

Happy Coding 🙂