Author

Ankit Kumar

Browsing

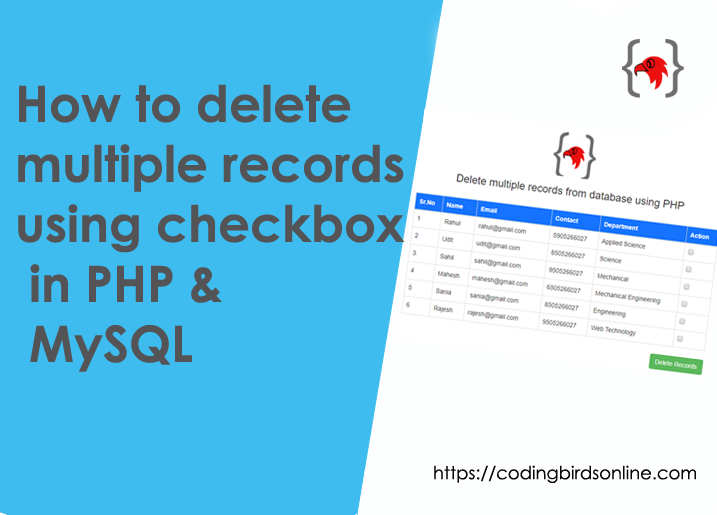
Hi, are you looking for the code in which you want to delete the multiple records using a checkbox? In this tutorial, you will learn to delete multiple records in PHP using the checkbox or selected checkbox.

In the previous tutorial, you learned about how to delete a single record. Here you learn about to delete the multiple records by selected checkbox with validation to select at least one checkbox. Here are the files and folders to delete multiple records in PHP. Check this demo.
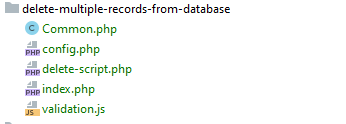
delete-multiple-records-in-php-using-the-checkbox-files-and-folder

So without wasting our time, let’s get started to create our files.

index.php

<!DOCTYPE html>
<html lang="en">
<head>
    <title>Delete records from database using PHP - Coding Birds Online</title>
    <meta charset="utf-8">
    <meta name="viewport" content="width=device-width, initial-scale=1">
    <link rel="stylesheet" href="https://maxcdn.bootstrapcdn.com/bootstrap/3.4.1/css/bootstrap.min.css">
    <script src="https://ajax.googleapis.com/ajax/libs/jquery/3.4.1/jquery.min.js"></script>
    <script src="validation.js"></script>
    <script src="https://maxcdn.bootstrapcdn.com/bootstrap/3.4.1/js/bootstrap.min.js"></script>
    <link rel="icon" href="https://codingbirdsonline.com/wp-content/uploads/2019/12/cropped-coding-birds-favicon-2-1-192x192.png" type="image/x-icon">
    <style>
        #thead>tr>th{ color: white; }
    </style>
</head>
<body>
<div style="margin-top: 20px;padding-bottom: 20px;">
    <center>
        <img width="100" src="https://codingbirdsonline.com/wp-content/uploads/2019/12/cropped-coding-birds-favicon-2-1-192x192.png"/>
        <h3>Delete multiple records from database using PHP </h3>
    </center>
</div>
<div class="container">
    <form action="delete-script.php" method="post">
    <table class="table table-bordered">
        <thead id="thead" style="background-color:#1573ff">
        <tr>
            <th>Sr.No</th>
            <th>Name</th>
            <th>Email</th>
            <th>Contact</th>
            <th>Department</th>
            <th>Action</th>
        </tr>
        </thead>
        <tbody>
        <?php
        include "config.php";
        include_once "Common.php";
        $common = new Common();
        $records = $common->getAllRecords($connection);
        if ($records->num_rows>0){
            $sr = 1;
            while ($record = $records->fetch_object()) {
                $recordId = $record->id;
                $name = $record->name;
                $email = $record->email;
                $contact = $record->contact;
                $department = $record->department;?>
                <tr>
                    <td><?php echo $sr;?></td>
                    <td><?php echo $name;?></td>
                    <td><?php echo $email;?></td>
                    <td><?php echo $contact;?></td>
                    <td><?php echo $department;?></td>
                    <td><input type="checkbox" name="recordsCheckBox[]" id="recordsCheckBox" value="<?php echo $recordId;?>"></td>
                </tr>
                <?php
                $sr++;
            }
        }
        ?>
        </tbody>
    </table>
        <input type="submit" name="deleteBtn" id="deleteBtn" class="btn btn-success" onclick="return validateForm();" value="Delete Records" style="float: right"/>
    </form>
</div>
</body>
</html>

This index.php file includes config.php and Common.php. These files are database connections and PHP class file. Let’s create these files.

config.php

<?php
$hostName = "localhost"; // host name
$username = "root";  // database username
$password = ""; // database password
$databaseName = "codingbirds"; // database name

$connection = new mysqli($hostName,$username,$password,$databaseName);
if (!$connection) {
    die("Error in database connection". $connection->connect_error);
}
?>

Common.php

<?php
class Common
{
    public function getAllRecords($connection) {
        $query = "SELECT * FROM bird_delete_records";
        $result = $connection->query($query) or die("Error in query1".$connection->error);
        return $result;
    }
    public function deleteRecordById($connection,$id) {
        $query = "DELETE FROM bird_delete_records WHERE id='$id'";
        $result = $connection->query($query) or die("Error in query".$connection->error);
        return $result;
    }
}

validation.js

function validateForm() {
    var count_checked = $("[name='recordsCheckBox[]']:checked").length;
    if (count_checked == 0) {
        alert("Please check at least one checkbox");
        return false;
    }else{
        return true;
    }
}

delete-script.php

<?php
include "config.php";
include_once "Common.php";
if (isset($_POST['deleteBtn'])){
    $recordIds = $_POST['recordsCheckBox'];
    $common = new Common();
    foreach ( $recordIds as $id ) {
        $delete = $common->deleteRecordById($connection,$id);
    }
    if ($delete) {
        echo '<script>alert("Record deleted successfully !")</script>';
        echo '<script>window.location.href="index.php";</script>';
    }
}

After running this code you will get output like this.
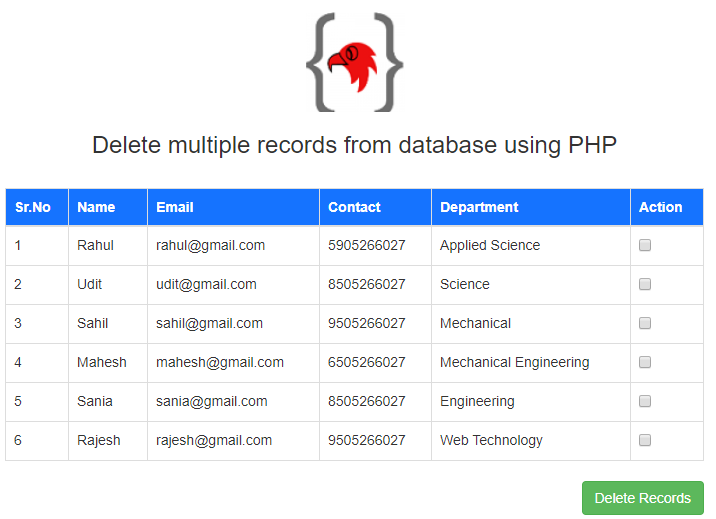
delete-multiple-records-in-php-using-the-checkbox-output

So this is the output when you run the code. Now if you press the delete button when you get a prompt alert that, select at least one checkbox.

After selecting and pressing the delete button the records will be deleted that you have selected before. I hope you understood the concept and the code.

You can download the full working source code from here so that there is no error in your code. You can also watch this video uploaded a year ago of mine, telling the same thing but in procedural style.

Happy Coding 🙂

In a web application, 4 operations are mainly performed, Create,Read, Update and Delete. These are called CRUD operations in short.

  • Create – This is the first operation that is to save the data to the database.
  • Read – This is the operation to read or display the saved data from the database.
  • Update – This is to update the existing records in a database.
  • Delete – Last but not least, this is used to perform delete operation in the database.

Each operation has its own query to perform its task. Let’s take a look at each query and we will understand its concepts in our tutorials. But here we will talk about Delete operation only.

PHP | MySQL Delete Query

The DELETE query is used to delete records from the database table.
It is generally used along with the “Select” statement to delete only those records that satisfy a specific condition.

Syntax

DELETE FROM table_name WHERE column_value=condition

Example

Consider this following table named bird_delete_records has column names id, name, email, contact, and department.

how-to-delete-records-from-a-database-with-php-example-table

To delete the records we will write this query as given below.

DELETE FROM bird_delete_records WHERE id=1

Then what we are doing just putting our table name to query and make a condition. If any column satisfies the condition then we delete the record.

I hope you got the concept behind this. Now, let’s make our hands dirty with code. We need to create these files. Here are the files and folders.

how-to-delete-records-from-a-database-with-php-filesand-folder

So you got the files and folder. Now we will create these files.

index.php

<!DOCTYPE html>
<html lang="en">
<head>
    <title>Delete records from database using PHP - Coding Birds Online</title>
    <meta charset="utf-8">
    <meta name="viewport" content="width=device-width, initial-scale=1">
    <link rel="stylesheet" href="https://maxcdn.bootstrapcdn.com/bootstrap/3.4.1/css/bootstrap.min.css">
    <script src="https://ajax.googleapis.com/ajax/libs/jquery/3.4.1/jquery.min.js"></script>
    <script src="https://maxcdn.bootstrapcdn.com/bootstrap/3.4.1/js/bootstrap.min.js"></script>
    <link rel="icon" href="https://codingbirdsonline.com/wp-content/uploads/2019/12/cropped-coding-birds-favicon-2-1-192x192.png" type="image/x-icon">
    <style>
        #thead>tr>th{ color: white; }
    </style>
</head>
<body>
<div style="margin-top: 20px;padding-bottom: 20px;">
    <center>
        <img width="100" src="https://codingbirdsonline.com/wp-content/uploads/2019/12/cropped-coding-birds-favicon-2-1-192x192.png"/>
        <h3>Delete records from database using PHP </h3>
    </center>
</div>
<div class="container">
    <table class="table">
        <thead id="thead" style="background-color: #26a2af">
        <tr>
            <th>Sr.No</th>
            <th>Name</th>
            <th>Email</th>
            <th>Contact</th>
            <th>Department</th>
            <th>Action</th>
        </tr>
        </thead>
        <tbody>
        <?php
        include "config.php";
        include_once "Common.php";
        $common = new Common();
        $records = $common->getAllRecords($connection);
        if ($records->num_rows>0){
            $sr = 1;
            while ($record = $records->fetch_object()) {
                $recordId = $record->id;
                $name = $record->name;
                $email = $record->email;
                $contact = $record->contact;
                $department = $record->department;?>
                <tr>
                    <th><?php echo $sr;?></th>
                    <th><?php echo $name;?></th>
                    <th><?php echo $email;?></th>
                    <th><?php echo $contact;?></th>
                    <th><?php echo $department;?></th>
                    <td><a href="delete-script.php?recordId=<?php echo $recordId?>" class="btn btn-danger btn-sm">Delete</a> </td>
                </tr>
                <?php
                $sr++;
            }
        }
        ?>
        </tbody>
    </table>
</div>
</body>
</html>

As you see the index.php file includes config.php and Common.php. These files are used to make the database connection and get records from the database and delete them, respectively. Create these files.

config.php

<?php
$hostName = "localhost"; // host name
$username = "root";  // database username
$password = ""; // database password
$databaseName = "codingbirds"; // database name

$connection = new mysqli($hostName,$username,$password,$databaseName);
if (!$connection) {
    die("Error in database connection". $connection->connect_error);
}
?>

Common.php

<?php
class Common
{
    public function getAllRecords($connection) {
        $query = "SELECT * FROM bird_delete_records";
        $result = $connection->query($query) or die("Error in query1".$connection->error);
        return $result;
    }

    public function deleteRecordById($connection,$recordId) {
        $query = "DELETE FROM bird_delete_records WHERE id='$recordId'";
        $result = $connection->query($query) or die("Error in query2".$connection->error);
        return $result;
    }
}

If you see index.php file and head over to where button we created we used delete-script.php?recordId=id. This is a query string variable when we use a question mark, a variable name is equal to value. This value will be received by delete-script.php to delete the records.

delete-script.php

<?php
include "config.php";
include_once "Common.php";
if (isset($_GET['recordId'])){
    $recordId = $_GET['recordId'];
    $common = new Common();
    $delete = $common->deleteRecordById($connection,$recordId);
    if ($delete){
        echo '<script>alert("Record deleted successfully !")</script>';
        echo '<script>window.location.href="index.php";</script>';
    }
}

In this file we are just creating an object of Common.php file, that is the class file. Here I have used the OOPs method. You can use procedural if you want. You can learn about oops from here.

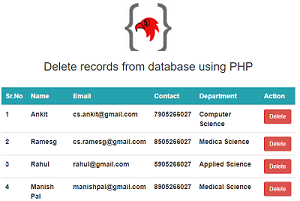
Now its time to test our code. Is it working? surely it will work. Don’t worry, I will provide source code also. So this is the output when you run the code.

how-to-delete-records-from-a-database-with-php-output-screen

When you click the delete button then you will get this success alert message, that Record deleted successfully!. You can download the source code also. So that there is no possibility of errors.

how-to-delete-records-from-a-database-with-php-delete-success-output

If you have any problem then you watch this video also. I uploaded it on youtube a year ago. But explains the same thing but in procedural style.

Thanks for visiting this blog. I will see you in the next article.

Happy Coding 🙂
Hey! Are you looking to create a country-state-city select dropdown? Here I will give you a quick guide with source code so that you can implement it in your application in 0 errors. Check this demo.

I am Ankit and today I am gonna tell you about how you can code this select Dropdown in an easy way.
This dropdown is a dependency dropdown between the country, state, city. When one dropdown value depends upon another dropdown value then it is called dependent or dependency dropdown.

About Country-state-city dropdown

In this tutorial, we will create an HTML form with 3 select dropdowns. Which is Country, State, City respectively? To get states first I will select a country from the dropdown, and after that to get city I will select a state. This is how dependent dropdown works together. Don’t worry I will explain how to make them dependent on each other.

What are the requirements?

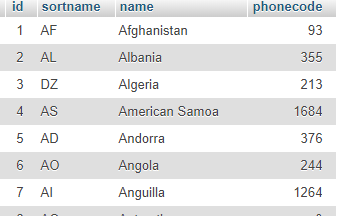
First of all, you need to have a number of countries in a country table in your database with a country id that is unique. 

Country Table

How-to-make country-state-city dropdown-in-PHP-country-table

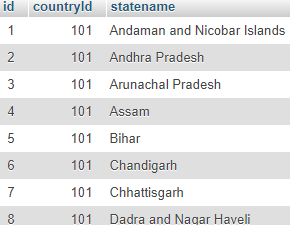
State Table

Then after, you need to have a states table in your database with entries of various states and a column on country id, so that you can identify the state name by country id.

How-to-make country-state-city dropdown-in-PHP-country-table-state-table

City Table

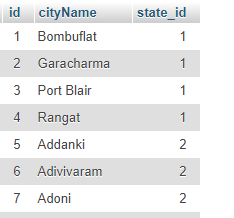
Then finally you need to have a city table contains the number of cities with an id of states accordingly.

How-to-make country-state-city dropdown-in-PHP-country-table-city-table

What is Logic ??

First I will fetch all the countries from the country table and display them to the first select dropdown, Rest two select dropdowns are empty.

Now I will call the onchange function of javaScript and make an AJAX request by taking the country id.
Then based on the country id, I will query the database and select the number of states which have this country id corresponding to the rows of the state table.

Now states dropdown has come. It is time to get cities based on state selection. Again I will call the function on the selection of state and make an AJAX request by taking the state id and query to the database as above.

Don’t worry I will give this data of SQL files like country, state, city table

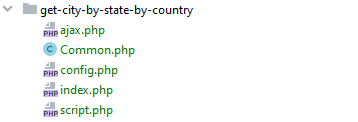
Let’s see the folder structure.

How-to-make country-state-city dropdown-in-PHP-country-folder-structure

Step by step process

  • First I will create an index.php file which is our mail file. I will create 3 select dropdowns in HTML of country, state, and city.
  • index.php file has the form tag with the action of script.php. Script.php is to simply print after submitting button.
  • Now I will create an ajax.php file, which is the logic file that receives the id of states and country depending upon AJAX request.
  • config.php is the connection file to the database.
  • Common.php is the PHP class file, which is responsible to query to the database.

Now its time to create these files. Let’s do it.

index.php

<!DOCTYPE html>
<html lang="en">
<head>
    <title>Upload Excel(CSV) file with PHP - CodingBirdsOnline.com</title>
    <meta charset="utf-8">
    <meta name="viewport" content="width=device-width, initial-scale=1">
    <link rel="stylesheet" href="https://maxcdn.bootstrapcdn.com/bootstrap/3.4.1/css/bootstrap.min.css">
    <script src="https://ajax.googleapis.com/ajax/libs/jquery/3.4.1/jquery.min.js"></script>
    <script src="https://maxcdn.bootstrapcdn.com/bootstrap/3.4.1/js/bootstrap.min.js"></script>
    <link rel="icon" href="https://codingbirdsonline.com/wp-content/uploads/2019/12/cropped-coding-birds-favicon-2-1-192x192.png" type="image/x-icon">
    <style>
    input[type=text], select {
        width: 100%;
        padding: 12px 20px;
        margin: 8px 0;
        display: inline-block;
        border: 1px solid #ccc;
        border-radius: 4px;
        box-sizing: border-box;
    }
    input[type=submit] {
        width: 100%;
        background-color: #4CAF50;
        color: white;
        padding: 10px;
        margin: 8px 0;
        border: none;
        border-radius: 4px;
        cursor: pointer;
    }

    input[type=submit]:hover {
        background-color: #45a049;
    }

    #box {
        border-radius: 5px;
        background-color: #f2f2f2;
        padding: 20px;
        margin: 0px 200px 0px 200px;
    }
</style>
</head>
<body>
<div class="jumbotron text-center">
    <h1>Get City by State by Country</h1>
    <p>https://codingbirdsonline.com</p>
</div>
<div id="box">
    <form action="script.php" method="post">
        <?php
        include "config.php";
        include_once "Common.php";
        $common = new Common();
        $countries = $common->getCountry($connection);
        ?>
        <label>Country <span style="color:red">*</span></label>
        <select name="country" id="countryId" class="form-control" onchange="getStateByCountry();">
            <option value="">Country</option>
            <?php
            if ($countries->num_rows > 0 ){
                while ($country = $countries->fetch_object()) {
                    $countryName = $country->name; ?>
                    <option value="<?php echo $country->id; ?>"><?php echo $countryName;?></option>
                <?php }
            }
            ?>
        </select>
        <label>State <span style="color:red">*</span></label>
        <select class="form-control" name="state" id="stateId" onchange="getCityByState();" >
            <option value="">State</option>
        </select>

        <label>City <span style="color:red">*</span></label>
        <select class="form-control" name="city" id="cityDiv">
            <option value="">City</option>
        </select>

        <input type="submit" value="Submit">
    </form>
</div>
<script>
    function getStateByCountry() {
        var countryId = $("#countryId").val();
        $.post("ajax.php",{getStateByCountry:'getStateByCountry',countryId:countryId},function (response) {
            var data = response.split('^');
            $("#stateId").html(data[1]);
        });
    }
    function getCityByState() {
        var stateId = $("#stateId").val();
        $.post("ajax.php",{getCityByState:'getCityByState',stateId:stateId},function (response) {
            var data = response.split('^');
            $("#cityDiv").html(data[1]);
        });
    }
</script>
</body>
</html>

ajax.php

<?php
include "config.php";
include_once "Common.php";
if (isset($_POST['getStateByCountry']) == "getStateByCountry") {
    $countryId = $_POST['countryId'];
    $common = new Common();
    $states = $common->getStateByCountry($connection,$countryId);
    $stateData = '<option value="">State</option>';
    if ($states->num_rows>0){
        while ($state = $states->fetch_object()) {
            $stateData .= '<option value="'.$state->id.'">'.$state->statename.'</option>';
        }
    }
    echo "test^".$stateData;
}
if (isset($_POST['getCityByState']) == "getCityByState") {
    $stateId = $_POST['stateId'];
    $common = new Common();
    $cities = $common->getCityByState($connection,$stateId);
    $cityData = '<option value="">City</option>';
    if ($cities->num_rows>0){
        while ($city = $cities->fetch_object()) {
            $cityData .= '<option value="'.$city->id.'">'.$city->cityName.'</option>';
        }
    }
    echo "test^".$cityData;
}

Common.php

<?php
/**
 * Created by PhpStorm.
 * User: Ankit
 * Date: 11/29/2018
 * Time: 7:50 PM
 */

class Common
{
  public function getCountry($connection)
  {
      $mainQuery = "SELECT * FROM bird_countries";
      $result1 = $connection->query($mainQuery) or die("Error in main Query".$connection->error);
      return $result1;
  }

  public function getStateByCountry($connection,$countryId){
      $query = "SELECT * FROM bird_states WHERE countryId='$countryId'";
      $result = $connection->query($query) or die("Error in  Query".$connection->error);
      return $result;
  }

  public function getCityByState($connection,$stateId){
      $query = "SELECT * FROM bird_cities WHERE state_id='$stateId'";
      $result = $connection->query($query) or die("Error in  Query".$connection->error);
      return $result;
  }
}

script.php

<?php
if (isset($_POST['submit'])) {
    $country = $_POST['country'];
    $state = $_POST['state'];
    $city = $_POST['city'];

    echo 'Country is: '. $country; echo '<br/>';
    echo 'State is  : '. $state; echo '<br/>';
    echo 'City is   : '. $city; echo '<br/>';
}

config.php

<?php
$connection = new mysqli("localhost","root","","codingbirds");
if (! $connection){
    die("Error in connection".$connection->connect_error);
}

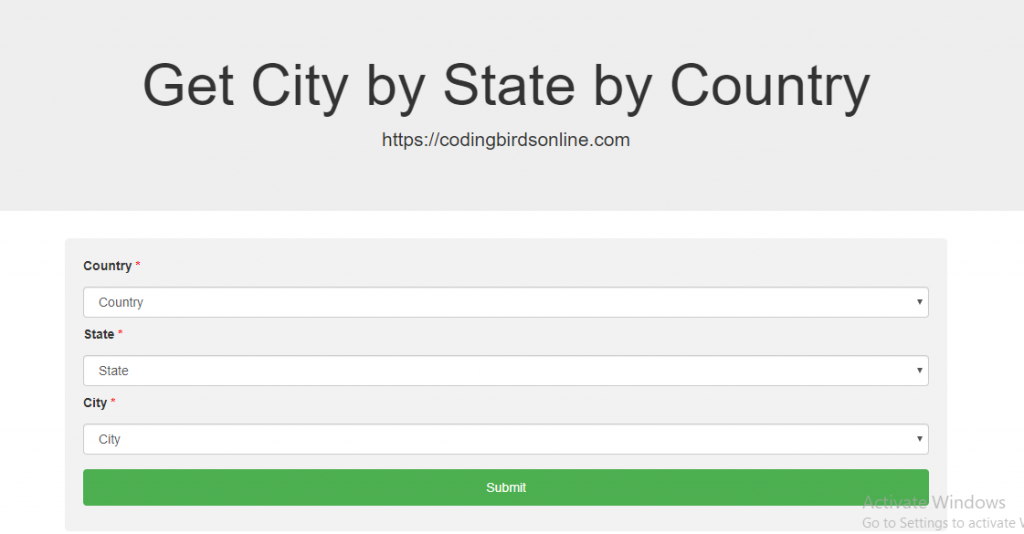
Now after creating these files to your editor, importing tables which I will provide and making a connection to your database with config.php file, Its time to test it. When you run it you will get output like below.

How-to-make country-state-city dropdown-in-PHP-output

Now as you see out in the browser, if you select a country, the states will appear according to that country. If you select the state then city as simple as that. You can also put a loader indicator while data is loading on the selected country. Learn how to create loading spinner indicator in jQuery ajax.

Source Code & Demo

So you enjoyed this tutorial and learned how to code this in easy ways. If you have any problem you can download the full working source code here. Check this demo.

Conclusion

In this tutorial, you learned about how to make country-state-city dependent dropdown or cascading dropdown. I hope you have enjoyed this tutorial. If there is anything for improvement, let me know I will be happy. If you face any problem with doing this, you can comment I will help.

If you want to learn how to upload excel(CSV) file to a database with PHP & MySQL in an easy way then you are in the right place. Also, read this how to Upload Multiple Images

Welcome to this blog, my name is Ankit and today I will tell how to do this. Saving an entry of data one by one to the database is the most difficult task in software or web application. Check this demo.

Why we need it?
Generally, We save data via FORM contains some fields like name, email, contact, gender or anything else. 

But imagine if there are hundreds or thousands of records of person or students, then manually saving the data is much complicated. But don’t worry we have something very interesting in PHP.
Then Solution?

The solution to this problem is that, If you can combine that data in an excel sheet or CSV format, then we can write a code in such a way that every entry is in an excel sheet will be saved to a database.
Now that’s enough to understand. Let’s dive into code.

The process of how to upload excel(CSV)

  • Create index.php. This will be a form to upload
  • Create excel-script.php. This is the logic of the code
  • Create a config.php. This is the connection file to the database
  • Create a Common.php. This is class has the function to upload in the database
  • Create a table named bird_excel_users.sql to the database that will save the data of the file

Now let’s create these files.

index.php

<!DOCTYPE html>
<html lang="en">
<head>
    <title>Upload Excel(CSV) file with PHP - CodingBirdsOnline.com</title>
    <meta charset="utf-8">
    <meta name="viewport" content="width=device-width, initial-scale=1">
    <link rel="stylesheet" href="https://maxcdn.bootstrapcdn.com/bootstrap/3.4.1/css/bootstrap.min.css">
    <script src="https://ajax.googleapis.com/ajax/libs/jquery/3.4.1/jquery.min.js"></script>
    <script src="https://maxcdn.bootstrapcdn.com/bootstrap/3.4.1/js/bootstrap.min.js"></script>
    <link rel="icon" href="https://codingbirdsonline.com/wp-content/uploads/2019/12/cropped-coding-birds-favicon-2-1-192x192.png" type="image/x-icon">
</head>
<body>
<div class="jumbotron text-center">
    <h1>Upload Excel(CSV) file with PHP</h1>
    <p>https://codingbirdsonline.com</p>
</div>
<div class="container">
    <form action="excel-script.php" method="post" enctype="multipart/form-data">
       <div class="row">
           <div class="col-md-4">
               <div class="form-group">
                   <input type="file" name="excelDoc" id="excelDoc" class="form-control" />
               </div>
           </div>
           <div class="col-md-4">
               <input type="submit" name="uploadBtn" id="uploadBtn" value="Upload Excel" class="btn btn-success" />
           </div>
       </div>
    </form>
</div>
</body>
</html>

This index.php file has form action uses excel-script.php.

excel-script.php

<?php
include  "config.php";
include_once  "Common.php";

if($_FILES['excelDoc']['name']) {
    $arrFileName = explode('.', $_FILES['excelDoc']['name']);
    if ($arrFileName[1] == 'csv') {
        $handle = fopen($_FILES['excelDoc']['tmp_name'], "r");
        $count = 0;
        while (($data = fgetcsv($handle, 1000, ",")) !== FALSE) {
            $count++;
            if ($count == 1) {
                continue; // skip the heading header of sheet
            }
                $name = $connection->real_escape_string($data[0]);
                $mobile = $connection->real_escape_string($data[1]);
                $email = $connection->real_escape_string($data[2]);
                $common = new Common();
                $SheetUpload = $common->uploadData($connection,$name,$mobile,$email);
        }
        if ($SheetUpload){
            echo "<script>alert('Excel file has been uploaded successfully !');window.location.href='index.php';</script>";
        }
    }
}

config.php

<?php
$connection = new mysqli("localhost","root","","codingbirds");
if (! $connection){
    die("Error in connection".$connection->connect_error);
}

Common.php

<?php
/**
 * Created by PhpStorm.
 * User: kc
 * Date: 11/29/2018
 * Time: 7:50 PM
 */

class Common
{
  public function uploadData($connection,$name,$contact,$email)
  {
      $mainQuery = "INSERT INTO  bird_excel_users SET name='$name',contact='$contact',email='$email'";
      $result1 = $connection->query($mainQuery) or die("Error in main Query".$connection->error);
      return $result1;
  }
}

bird_excel_users.sql

ATTACHMENT DETAILS how-to-upload-excelCSV-file-to-a-database-with-PHP-MySQL-table-coding-birds-online.png

If you face any errors in coding, then you can comment and I will surely help. And you can download the source code from here.

If you still face any problem, you can watch my video also.

Sending email is mostly used in a variety of websites and web applications. It mostly happens when you send an email by PHP code copied from other websites or blog, it goes to the spam folder. If you want to resolve this issue then you are in the right place. You can check the demo.

Check this also: Send email in PHP using PHPMailer with attachment

 
Hi, there I am Ankit will tell you how to code so that your email will not go to the spam folder.
Sending email messages is very common things for a web application, for example, sending a welcome email when a user creates an account on your website, sending newsletters to your registered users, or getting user feedback or comment through the website’s contact form, and so on.
 
For doing this, PHP provides a built-in PHP function called mail( ) for creating and sending email messages to one or more recipients dynamically from your PHP application either in a plain-text form or formatted HTML. The basic syntax of this function can be given with:
 
mail(to, subject, message, headers, parameters)

This functions 4 required parameters

  • to – This is the first parameter required. Put the email id of the person to which you want to send the emails.
  • subject – This is the 2nd parameter tells the subject of the mail you want, you can write it.
  • message – This is the 3rd parameter. As the name suggests, This is the message what you want to send to recipients.
  • headers – This is the 4th parameter which tells about who is sending the email, what is the name of the sender …etc.
So that’s enough. Let’s make our hands dirty with code.
 
Create the index.php file
 
<!doctype html>
<html lang="en">
<head>
    <meta charset="UTF-8">
    <meta name="viewport" content="width=device-width, user-scalable=no, initial-scale=1.0, maximum-scale=1.0, minimum-scale=1.0">
    <meta http-equiv="X-UA-Compatible" content="ie=edge">
    <link rel="icon" href="https://codingbirdsonline.com/wp-content/uploads/2019/12/cropped-coding-birds-favicon-2-1-192x192.png" type="image/x-icon">
    <link rel="stylesheet" href="https://stackpath.bootstrapcdn.com/bootstrap/4.3.1/css/bootstrap.min.css">
    <link rel="stylesheet" href="https://use.fontawesome.com/releases/v5.8.2/css/all.css">
    <script type="text/javascript" src="https://cdnjs.cloudflare.com/ajax/libs/jquery/3.4.1/jquery.slim.min.js"></script>
    <script type="text/javascript" src="https://stackpath.bootstrapcdn.com/bootstrap/4.3.1/js/bootstrap.bundle.min.js"></script>
    <title>Send Email Example</title>
</head>
<body>
<div class="container">
    <div class="row">
        <div class="col-sm-9 col-md-7 col-lg-5 mx-auto">
            <div class="card card-signin my-5">
                <div class="card-body">
                    <h5 class="card-title text-center">Send Email</h5>
                    <form action="email-script.php" method="post" class="form-signin">
                        <div class="form-label-group">
                            <label for="inputEmail">From <span style="color: #FF0000">*</span></label>
                            <input type="text" name="fromEmail" id="fromEmail" class="form-control"  value="info@codingbirdsonline.com" readonly required autofocus>
                        </div> <br/>
                        <div class="form-label-group">
                            <label for="inputEmail">To <span style="color: #FF0000">*</span></label>
                            <input type="text" name="toEmail" id="toEmail" class="form-control" placeholder="Email address" required autofocus>
                        </div> <br/>
                        <label for="inputPassword">Subject <span style="color: #FF0000">*</span></label>
                        <div class="form-label-group">
                            <input type="text" id="subject" name="subject" class="form-control" placeholder="Subject" required>
                        </div><br/>
                        <label for="inputPassword">Message <span style="color: #FF0000">*</span></label>
                        <div class="form-label-group">
                            <textarea  id="message" name="message" class="form-control" placeholder="Message" required ></textarea>
                        </div> <br/>
                        <button type="submit" name="sendMailBtn" class="btn btn-lg btn-primary btn-block text-uppercase" >Send Email</button>
                    </form>
                </div>
            </div>
        </div>
    </div>
</div>
</body>
</html>

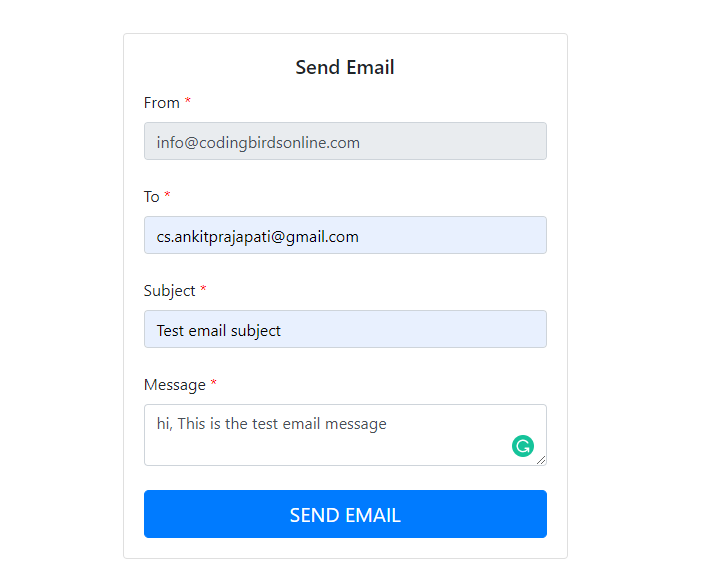
When you will check, you will get this output

 How to send email in PHP step by step-output

In index.php you have <form> tag has the action of email-script.php. This is code for same.

email-script.php

<?php
if (isset($_POST['sendMailBtn'])) {
    $fromEmail = $_POST['fromEmail'];
    $toEmail = $_POST['toEmail'];
    $subjectName = $_POST['subject'];
    $message = $_POST['message'];

    $to = $toEmail;
    $subject = $subjectName;
    $headers = "MIME-Version: 1.0" . "\r\n";
    $headers .= "Content-type:text/html;charset=UTF-8" . "\r\n";
    $headers .= 'From: '.$fromEmail.'<'.$fromEmail.'>' . "\r\n".'Reply-To: '.$fromEmail."\r\n" . 'X-Mailer: PHP/' . phpversion();
    $message = '<!doctype html>
			<html lang="en">
			<head>
				<meta charset="UTF-8">
				<meta name="viewport"
					  content="width=device-width, user-scalable=no, initial-scale=1.0, maximum-scale=1.0, minimum-scale=1.0">
				<meta http-equiv="X-UA-Compatible" content="ie=edge">
				<title>Document</title>
			</head>
			<body>
			<span class="preheader" style="color: transparent; display: none; height: 0; max-height: 0; max-width: 0; opacity: 0; overflow: hidden; mso-hide: all; visibility: hidden; width: 0;">'.$message.'</span>
				<div class="container">
                 '.$message.'<br/>
                    Regards<br/>
                  '.$fromEmail.'
				</div>
			</body>
			</html>';
    $result = @mail($to, $subject, $message, $headers);

    echo '<script>alert("Email sent successfully !")</script>';
    echo '<script>window.location.href="index.php";</script>';
}

Testing

Now upload to these files to your live server and fill the form, hit the submit button.

How-to-send-email-in-PHP-step-by-step-output-2
How to send email in PHP step by step-output

You just need to copy and paste the code nothing else. The code is very simple. And if you still face any problem you can download the source code from here.

You can also watch this video explained the same as in the above post.

Happy coding 🙂

Uploading images or files is the functionality that is mostly used in web applications. In most cases, we upload a single image or file like a profile picture, pdf file or anything else. In this tutorial, you will learn How to Upload Multiple Images in PHP step by step. Check our demo.

But when it comes to uploading multiple images or files we need to think some logic and process how to do that. But sometimes you have a requirement to upload multiple images at once.

Generally, in the web application, the file/image is uploaded to the folder of the server and the file name is stored in the database. Later the files are fetched from the folder based on the file name stored in the database.  

In this tutorial, we will implement all these processes, step by step.

  • Create a database table.
  • Create an image/file uploading form.
  • The database connection file.
  • The image uploads the logic script file.
  • Display Images from Database.
  • Complete Code

Create a database table

First, we need to make a database table to store the names of images we will upload. As we know earlier, Images are stored in the folder of the server and the name is saved to database tables.

Create two columns named ID and imgName with ID to be auto-incremented. I hope you know how to create tables in the database.

Create an image/file uploading form

  <form action="upload-script.php" method="post" enctype="multipart/form-data">
        <div class="form-group">
            <div class="row">
               <div class="col-md-4">
                   <div class="form-group">
                       <input type="file" name="imageFile[]" required multiple class="form-control">
                   </div>
               </div>
                <div class="col-md-4">
                    <div class="form-group">
                        <input type="submit" name="uploadImageBtn" id="uploadImageBtn" value="Upload Images" class="btn btn-success">
                    </div>
                </div>
            </div>
        </div>
    </form>

If you see in this <form> tag, I used the action to upload-script.php. This is the logic file to upload multiple images. And name=”imageFile[]”, there are square braces that indicate an array of images.

The database connection file

<?php
$hostName = "localhost"; // host name
$username = "root";  // database username
$password = ""; // database password
$databaseName = "codingbirds"; // database name

$connection = new mysqli($hostName,$username,$password,$databaseName);
if (!$connection) {
    die("Error in database connection". $connection->connect_error);
}
?>

This is the connection file to the database. There are hostname, username, password and database name. You can change accordingly.

The image uploads the logic script file

upload-script.php

<?php
include "config.php";
if (isset($_POST['uploadImageBtn'])) {
    $uploadFolder = 'uploads/';
    foreach ($_FILES['imageFile']['tmp_name'] as $key => $image) {
        $imageTmpName = $_FILES['imageFile']['tmp_name'][$key];
        $imageName = $_FILES['imageFile']['name'][$key];
        $result = move_uploaded_file($imageTmpName,$uploadFolder.$imageName);

        // save to database
        $query = "INSERT INTO bird_multiple_images SET imgName='$imageName' " ;
        $run = $connection->query($query) or die("Error in saving image".$connection->error);
    }
    if ($result) {
        echo '<script>alert("Images uploaded successfully !")</script>';
        echo '<script>window.location.href="index.php";</script>';
    }
}

This code has a foreach loop to upload multiple images and uploads them into a folder named “uploads”. And finally saves the name of the images to the database.

Display Images from Database

This is the code to fetch images from the database and display it in a row-column format.

 <?php
// fetch Images
$i = 1;
include "config.php";
$queryGetImg = "SELECT * FROM bird_multiple_images";
$resultImg = $connection->query($queryGetImg);
if ($resultImg->num_rows > 0 ){
  while ($row = $resultImg->fetch_object()){ ?>
     <div class="col-sm-3">
	<h3>Image <?php echo $i;?></h3>
	<img src="<?php echo 'uploads/'.$row->imgName;?>"/>
    </div>
    <?php $i++;
   }
}
?>

Complete Code for How to Upload Multiple Images

Here is the complete code that includes all the steps told above. I separated the code so that you can understand properly. Now following is the complete code for you.

index.php

<!DOCTYPE html>
<html lang="en">
<head>
    <title>Upload Multiple Images with PHP</title>
    <meta charset="utf-8">
    <meta name="viewport" content="width=device-width, initial-scale=1">
    <link rel="stylesheet" href="https://maxcdn.bootstrapcdn.com/bootstrap/3.4.1/css/bootstrap.min.css">
    <script src="https://ajax.googleapis.com/ajax/libs/jquery/3.4.1/jquery.min.js"></script>
    <script src="https://maxcdn.bootstrapcdn.com/bootstrap/3.4.1/js/bootstrap.min.js"></script>
    <link rel="icon" href="https://codingbirdsonline.com/wp-content/uploads/2019/12/cropped-coding-birds-favicon-2-1-192x192.png" type="image/x-icon">
</head>
<body>
<div class="jumbotron text-center">
    <h1>Upload Multiple Images with PHP</h1>
    <p>Resize this responsive page to see the effect!</p>
</div>
<div class="container">
    <form action="upload-script.php" method="post" enctype="multipart/form-data">
        <div class="form-group">
            <div class="row">
               <div class="col-md-4">
                   <div class="form-group">
                       <input type="file" name="imageFile[]" required multiple class="form-control">
                   </div>
               </div>
                <div class="col-md-4">
                    <div class="form-group">
                        <input type="submit" name="uploadImageBtn" id="uploadImageBtn" value="Upload Images" class="btn btn-success">
                    </div>
                </div>
            </div>
        </div>
    </form>

    <div class="row">
        <?php
        // fetch Images
        $i = 1;
        include "config.php";
        $queryGetImg = "SELECT * FROM bird_multiple_images";
        $resultImg = $connection->query($queryGetImg);
        if ($resultImg->num_rows > 0 ){
            while ($row = $resultImg->fetch_object()){ ?>
                <div class="col-sm-3">
                    <h3>Image <?php echo $i;?></h3>
                    <img src="<?php echo 'uploads/'.$row->imgName;?>"/>
                </div>
           <?php $i++;
            }
        }
        ?>
    </div>
</div>
</body>
</html>

If you face any errors in coding, then you can comment and I will surely help. And you can download the source code from here.

You can watch the video also on my YouTube channel named KanpurWebD and make sure you subscribe also.


Happy Coding 🙂
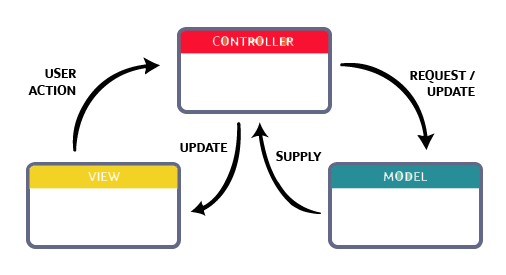
MVC is the software and web development approach that separates the logic of your application.
MVC stands for Model, View, and Controller, later becomes the design pattern for the majority of the software, web applications and frameworks.

Read more about Easiest Framework on PHP

Model

The model is the core part of MCV software or applications. It is the place where the majority of the logic of the application is built. Like getting the data from the database, applying filters. This is responsible for the data storage, process, and delivery of the data to the user in the front end.
The model connects the database where everything is stored. When a user makes valid requests, then it queries the data from the database based on the requests.

View 

The view is the front part of MVC that is visible to the user, while the model was the logic part.
Suppose a college is an application, you can identify the model, view, and controller as – A-Class in a college is a model, Teacher is a controller and students are views. Views are the objects within the application displayed to the user. Views are the interface like text, buttons, images..etc.It is the place where data is displayed after the request submitted, received and validated.

Controller

As the name is itself defines what’s it. A controller controls the user, how to interact with the application. The controller accepts user requests from interface or front-end. These requests are often in the form of HTTP and call the model.
Model retrieve, process and validate the data before returning to the controller.
After validation, the controller uses an appreciate view or status to show the user.

What is MVC? A simple explanation for beginners & Intermediate-process

Let’s take a real-world example. Suppose you have registered on any website using your email address and password.
Now you have done something and signed out. Now after someday you have any work to be done. For this, you want to login to that website again ( Facebook.. assume).

To login to the website you have to enter your email and password.
After pressing the submit button, you may see a loading, with a message please wait. That’s the View.
But in MVC terms, the controller receives your email and password. Now that controller sends them to model.

Now model validates whether these are valid( checks did you registered with these credentials) or not.
Waiting for a second you will get a message saying invalid email or password if you have entered wrong credentials. Otherwise, you will be redirected to the dashboard/home page if correct.


What is the need for MVC?

MVC separates the logic, design and controller part of the application. It reduces complexity and increases the readability of the coding.

MVC reduces the complexity of software and web applications and makes it easier to maintain.
Suppose you are developing a login system for your application.  So you write everything on a single page. The design part, logic part, and database part also.

After some days you will find your self difficult to understand your own code and think why you have written this particular code. 

That’s why we use the MVC pattern. Almost all the frameworks like Django, Flask in Python, Spring, Hibernate in Java and Laravel, CodeIgniter, CakePHP in PHP, use MVC design pattern.

features

  • easy and frictionless testability. Highly testable, extensible and pluggable framework
  • It offers full control over your HTML as well as your URLs.
  • Leverage existing features provided by JSP, Django, etc.
  • Clear separation of logic: Model, View, Controller. Separation of application tasks viz. business logic, Ul logic, and input logic.
  • URL Routing for SEO Friendly URLs. Powerful URL- mapping for comprehensible and searchable URLs.

I hope you got the concept. See you in the next article like this.
Happy Coding 🙂

Publishing the own website on the internet or making it live is the dream of every fresher. If you want to publish your website for free then you are in the right place.  

Most of us learn new things like coding, development  & new technologies. Creating a website is only the first step in getting online, you will also need to host a website or in simple terms upload the website to the internet.  

How you will do that?  

You will need to purchase domain & hosting. The domain is the name by which you will be able to see your website over the internet. For example, codingbirdsonline.com is the domain name.  

And the second thing required is hosting. Hosting is the place where you will upload your website or your website’s files.

  Purchasing domain & hosting requires money at least 1500 to 2000 INR, not considering from reputed hosting company providers like Godaddy, Siteground, Bigrock, etc. Otherwise, they will charge greater than this amount.  

Don’t worry you don’t need to purchase anything to publish your website.   Where can I host my website for free ??  

The answer is 000webhost  

You may be saying what’s this? The is itself a website provides free hosting, you will not be charged even 0 $. How’s it is possible?   Since it provides free hosting, so you will not get a domain like .com, .in,.org, etc.   You will get a subdomain like ‘username’ can be changed if it does not exist already.   Ready….?  Ok, follow the steps. You need to create the account. Don’t worry it is free.

Signup

Open the website 000webhost.com. When you will open website and clicking signup you will get something like this

How-to-publish-your-website-for-free-signup

Email Verification

Remember you can not create two accounts by the same email id. After signup, you will get an email asking to verify your email so that your account can be activated. It is like this

How to publish your website for free step-by-step

Members Panel

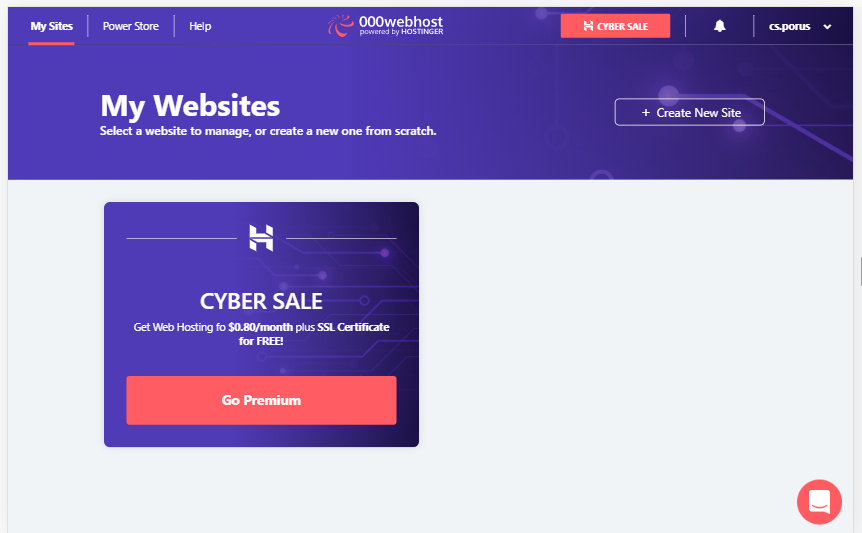
After email verification, you will be asked that what you are interested in, what you want to create a website or blog like this. Simply skip all you will be redirected to members panel as …

How to publish your website for free-member-panel

Create New Site

Now you can see there is a create site button click on you will get a popup asking to enter website name and a password, copy your password somewhere. Your website name will codingbirdsonline (assume) . Click the create button. First, it will check whether this website name already exists or not. If exists you will a warning to change it. If the website created you will get like this.

How to publish your website for free-after-website-created

Now you have so many options like website builder, WordPress, WiX and file manager. You can check other options but here we will see how to upload your own website. For doing this click on file manager.

After that, you will get a panel to upload your website or create files. You can upload a zip file that contains your website files. I will upload an index.php file that has this code.

Publish your website

<?php
    echo "Hey ! I have uploaded my website !";
 ?>

Now your website URL will be http://codingbirdsonline.000webhostapp.com/

Congratulations !!, You have uploaded, hosted your own website free of cost. If you face any problem or missing some steps feel free to comment, I will help you. If you like this article please share it with your friends also.

Happy Coding 🙂
If you are looking to learn how to create a loading spinner or put a loading icon when there is ajax request or form submission then you are in right place.

Hi there I am Ankit, I will tell you how to code to make a loading indicator that shows that the server is busy with some ajax requests. You can check our demo.
 
Creating a busy indicator, or spinner loader is required when you fetch records from the server, then obviously it may take time depending upon the number of records in database or internet speed or both.
In most of the web applications or websites ajax request is created.

Why need loading spinner ?

Example: If you are on Railway websites booking a ticket then you search for a train, what you see? You see a loading icon that says please wait…
 
But actually, in the background, there may be n number of ajax requests. Developers place a loading icon to show that there is something processing.
 
Here I am showing you an example that fetches records from the database. The loading spinner, indicator, leading icon whatever you say will be displayed until all the records not fetched.
 
One thing I will do, the user can’t do anything until data is not loaded. I mean mouse will be disabled for that particular browser tab. Now that’s enough to understand. Let’s make our hands dirty with code.

CSS

Here, This CSS is not mandatory but if you keep it will make user un clickable to page.

th{ color: white; }
.modal-busy {
    position: fixed;
    z-index: 999;
    height: 100%;
    width: 100%;
    top: 0;
    left: 0;
    background-color: Black;
    filter: alpha(opacity=60);
    opacity: 0.6;
    -moz-opacity: 0.8;
}
.center-busy {
    z-index: 1000;
    margin: 300px auto;
    padding: 0px;
    width: 130px;
    filter: alpha(opacity=100);
    opacity: 1;
    -moz-opacity: 1;
}
.center-busy img {
    height: 128px;
    width: 128px;
}

<div> making unclickable

<div class="modal-busy" id="loader" style="display: none">
    <div class="center-busy" id="test-git">
        <img alt="" src="ajax-loading.gif" />
    </div>
</div>

ajax.js

This code fetches the records from the server using AJAX request, and responsible to show loader icon until data is not fully loaded.

$(document).ready(function () {
    $("#loader").show();
    $.post("script.php",{api:"getData"},function (response) {
        var data = response.split('^');
        $("#tbody").html(data[1]);
        $("#loader").hide();
    });
});

script.php

This code the actual logic that fetches the records from the database by SQL query.

<?php
include "config.php";
include_once "Common.php";
if (isset($_POST['api']) == "getData") {
    $sr = 1;
    $tableData = '';
    $common = new Common();
    $data = $common->getData($connection);
    if ($data->num_rows > 0 ){
        while ($row = $data->fetch_object()) {
            $tableData .= '<tr>
                    <td>'.$sr.'</td>
                    <td>'.$row->name.'</td>
                    <td>'.$row->class.'</td>
                    <td>'.$row->marks.'</td>
                    <td>'.$row->gender.'</td>
        </tr>';
            $sr++;
        }
        echo 'test^'.$tableData;
    }
}

This file includes config.php & Common.php. The code is given below.

Config.php

<?php
    $connection = new mysqli("localhost","root","","codingbirds");
    if (!$connection) {
        die("Error in database connection". $connection->connect_error);
    }
?>

Common.php

<?php
class Common
{
    public function getData($connection) {
        $query = "SELECT * FROM bird_records";
        $result = $connection->query($query);
        return $result;
    }
}

I have given the code in parts so that I can make you understand. Now here is the complete code

Complete Code

<!DOCTYPE html>
<html lang="en">
<head>
    <title>Bootstrap Example</title>
    <meta charset="utf-8">
    <link rel="icon" href="https://codingbirdsonline.com/wp-content/
uploads/2019/12/cropped-coding-birds-favicon-2-1-192x192.png" 
type="image/x-icon">
    <meta name="viewport" content="width=device-width, initial-scale=1">
    <link rel="stylesheet" href="https://maxcdn.bootstrapcdn.com/bootstrap/
3.4.0/css/bootstrap.min.css">
    <script src="https://ajax.googleapis.com/ajax/libs/jquery/
3.4.1/jquery.min.js"</script>
    <script src="ajax.js"></script>
    <script src="https://maxcdn.bootstrapcdn.com/bootstrap/3.4.0/js/
    bootstrap.min.js"></script>
    <style>
        th{ color: white; }
        .modal-busy {
            position: fixed;
            z-index: 999;
            height: 100%;
            width: 100%;
            top: 0;
            left: 0;
            background-color: Black;
            filter: alpha(opacity=60);
            opacity: 0.6;
            -moz-opacity: 0.8;
        }
        .center-busy {
            z-index: 1000;
            margin: 300px auto;
            padding: 0px;
            width: 130px;
            filter: alpha(opacity=100);
            opacity: 1;
            -moz-opacity: 1;
        }
        .center-busy img {
            height: 128px;
            width: 128px;
        }
    </style>
</head>
<body>

<div class="container" style="margin-top: 50px;">
    <center>
        <img width="50"  src="https://codingbirdsonline.com/wp-content/
   uploads/2019/12/cropped-coding-birds-favicon-2-1-192x192.png"/>
    </center>
    <h2>Create loading spinner indicator in jquery ajax,
 while data loads</h2>
    <p>How to create loading spinner indicator in jquery ajax</p>
    <table class="table">
        <thead>
        <tr style="background-color: #1573ff">
            <th>Sr.No</th>
            <th>Name</th>
            <th>Class</th>
            <th>Marks</th>
            <th>Gender</th>
        </tr>
        </thead>
        <tbody id="tbody"></tbody>
    </table>
</div>
</body>
<div class="modal-busy" id="loader" style="display: none">
    <div class="center-busy" id="test-git">
        <img alt="" src="ajax-loading.gif" />
    </div>
</div>
</html>

I hope you got how to do this. If you face any error or missing any steps then you can download the source code from here.

Thanks for visiting Happy Coding 🙂

You have done training or internship in PHP and understood the basics, oops concepts, build some projects … Cool.

 Now if you are looking to learn something new on PHP  then this post is going to be useful for you.
Hi there, I am Ankit, will try to make you understand what should you learn after core PHP. Well… There are verify of frameworks on PHP but I will suggest learning the easiest and light-weighted first.

The most popular and trending framework is Laravel. Then you must be thinking “I should learn Laravel ? “.  Of course, you can but if talk about simplicity and easiness then there is no other framework except CodeIgniter. Here we will talk about it.

From my experience, I will suggest CodeIgniter, the first framework to learn.
It is always a good practice to start with small & simple things to learn. If you want to continue you have to learn more than 1 framework.

Once you start with something simple you can get into more complex frameworks like Yii, Symphony, CakePHP, Zend, Laravel, etc.

What is CodeIgniter?

CodeIgniter is a very easy, simple, lightweight, MVC framework of PHP for developing applications rapidly in an easy way. MVC stands for Model View Controller. CodeIgniter’s libraries are out of the box for connecting to the database and performing various operations like sending emails, uploading files, managing sessions, etc. Read more about Library & Frameworks.

Why learn CodeIgniter?

Easy to install

CodeIgniter is also called CI in short. CI has a system folder and index.php.Installation is very easy unlike other PHP frameworks, the Composer is not required for installation.  Just download the stable version from here and extract it to the root directory of your server. Change the base URL in config.php, you are ready to go.

Easy to learn

CI is simply has everything you required to write good code like MCV, Query builders and helper. It takes a couple of weeks to code confidently in CodeIgniter.

CI’s official user guide is excellent with plenty of examples of every topic. It also used in REST API development for mobile applications and making HTTP requests.

After your experience with the easiest and light-weighted CI, Laravel is now easier to pick up. You can do the same thing in different ways. Laravel seems to be a better MCV framework than CodeIgniter but its docs are not good as CI.