Hello everyone, Today in this tutorial I will show you how to create login with Google account using JavaScript OAuth-library in your web application. You can find N number of tutorials on Google authentication but this tutorial is different from them.
This tutorial tells how easy it is to integrate login with Google authentication. In this tutorial, you don’t need to use/download a third partly PHP library provided by Google, unlike other tutorials.
Instead of this you just need to register your app to Google API Console, generate the client Id and secret keys and include a CDN. Don’t worry I will cover each and every step and provide the source code.
Why use Login with Google OAuth library?
Login with Google, JavaScript OAuth library is a quick and powerful way to integrate the login system in the web application. If you do it by using JavaScript, It will enhance the user experience, without page refresh. Google login with JavaScript API allows the user to log in on your website with their Google account.
The best advantage of using the Google JavaScript API library is that the login process can be implemented on a single page without page refresh. Check our demo.
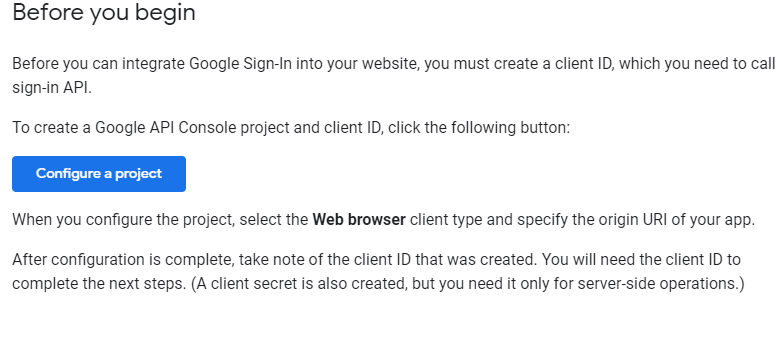
Click on the Configure a project button and a popup window appears on the same page with a select dropdown. If you created any project that will be listed, If you didn’t create, click on create project option. Enter a project name and click next. You will get another window as.
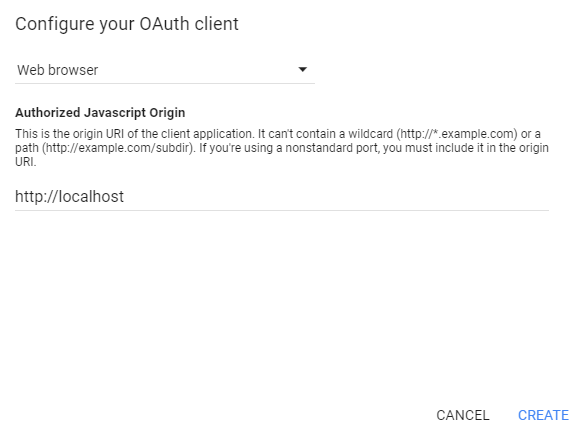
In this first dropdown select “Web browser” and in the Authorized Javascript Origin, enter your URL or domain.
Note:
If you working on the localhost then the above URL as shown in the picture is correct and will work for the localhost only.
Then you need to type this URL https://demo.codingbirdsonline.com. If you want to host your code to subdomain. OR https://codingbirdsonline.com, if want to in root.
Make sure, you remove forward slash “/” from last.
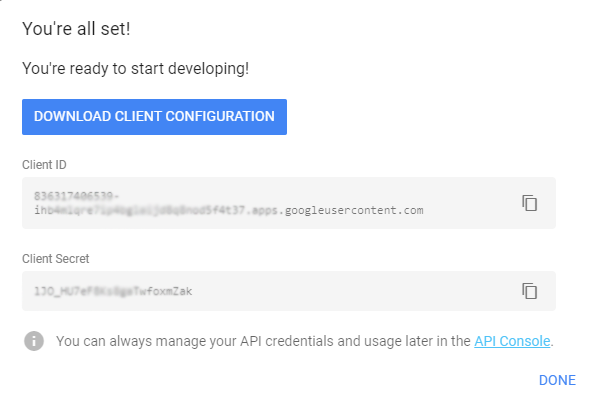
Click on Create, you will be asked to enter product name or application. This is the name shown during authentication.
Now you will get the Client ID and secret ID.
2- Enable API for the project
Open Google Developer Consol, on the top left you will get a dropdown. Select the project that you created in step 1.
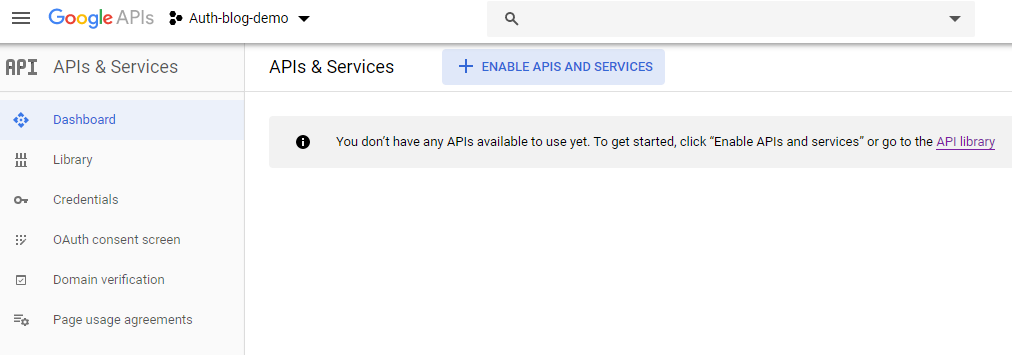
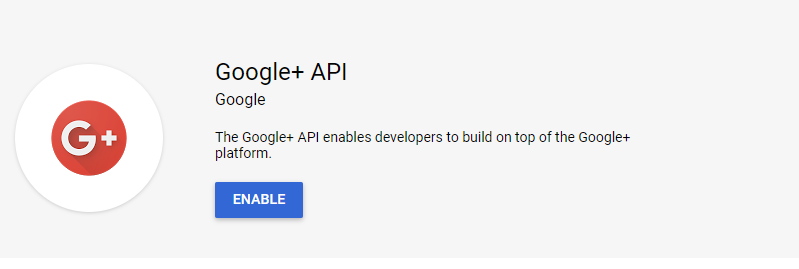
Click on the +ENABLE APIS AND SERVICES button and you will be redirected to a page of API. Find Google+ API and enable it.
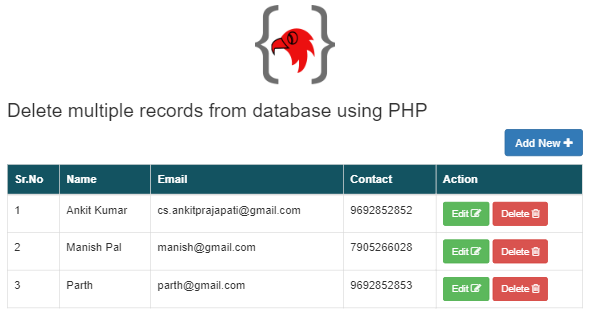
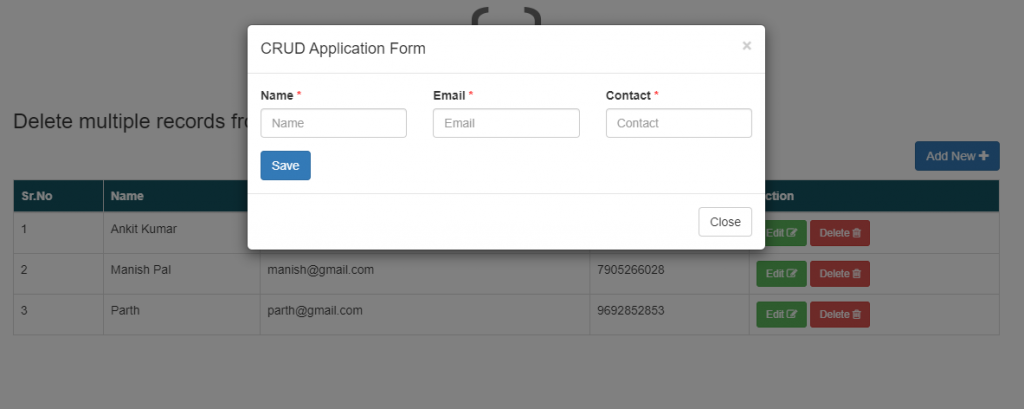
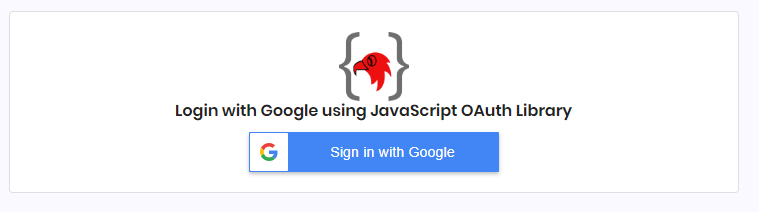
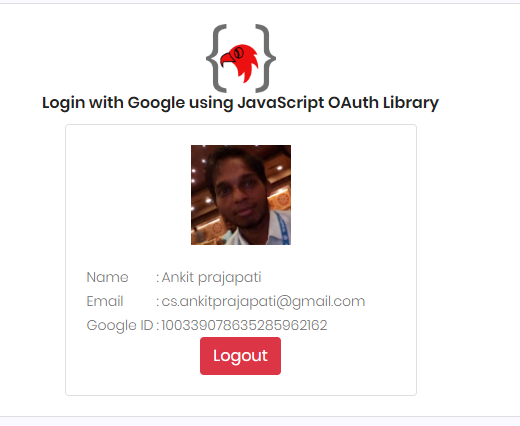
That’s it !!! Now we are just away from our dream. We need some code to configure. In this example, I have a Google Login button. When the user clicks on that, authenticated by his Google account. We save that information provided, for reference. And if he performs the same thing again then we just update our database.
config.php is the connection file to the database.
Google-auth-script.js is the JavaScript file to authenticate and saving the data by AJAX.
index.php is the main file that has the Google Login button.
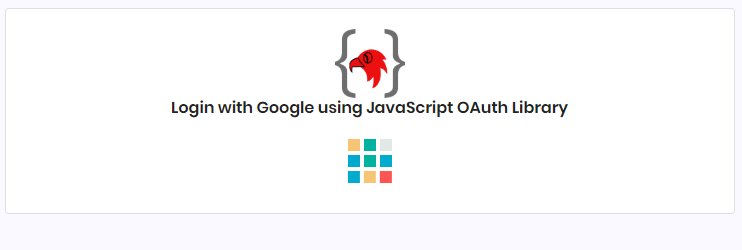
loader-icon.gif is the loader icon.
script.php is the PHP script file that saves data to the database.
Here, make sure you include Bootstrap and jQuery also. Since we will make AJAX request to save information. Include this above code to the head tag of the index.php file.
function renderButton() {
gapi.signin2.render('g-signin2', {
'scope': 'profile email',
'width': 250,
'height': 40,
'longtitle': true,
'theme': 'dark',
'onsuccess': onSignIn,
'onfailure': onFailure
});
}
function onSignIn(googleUser) {
var profile = googleUser.getBasicProfile();
console.log('ID: ' + profile.getId()); // Do not send to your backend! Use an ID token instead.
console.log('Name: ' + profile.getName());
console.log('Image URL: ' + profile.getImageUrl());
console.log('Email: ' + profile.getEmail());
var googleTockenId = profile.getId();
var name = profile.getName();
var email = profile.getEmail();
var profile = profile.getImageUrl();
$("#loaderIcon").show('fast');
$("#g-signin2").hide('fast');
saveUserData(googleTockenId,name,email,profile); // save data to our database for reference
}
// Sign-in failure callback
function onFailure(error) {
alert(error);
}
// Sign out the user
function signOut() {
if(confirm("Are you sure to signout?")){
var auth2 = gapi.auth2.getAuthInstance();
auth2.signOut().then(function () {
$("#loginDetails").hide();
$("#loaderIcon").hide('fast');
$("#g-signin2").show('fast');
});
auth2.disconnect();
}
}
function saveUserData(googleTockenId,name,email,profile) {
$.post("script.php",{authProvider:"Google",googleTockenId:googleTockenId,name:name,email:email,profile:profile},
function (response) {
var data = response.split('^');
if (data[1] == "loggedIn"){
$("#loaderIcon").hide('fast');
$("#g-signin2").hide('fast');
$("#profileLabel").attr('src',profile);
$("#nameLabel").html(name);
$("#emailLabel").html(email);
$("#googleIdLabel").html(googleTockenId);
$("#loginDetails").show();
}
});
}
function renderButton(){
gapi.signin2.render('g-signin2',{
'scope':'profile email',
'width':250,
'height':40,
'longtitle':true,
'theme':'dark',
'onsuccess': onSignIn,
'onfailure': onFailure
});
}
function onSignIn(googleUser){
var profile = googleUser.getBasicProfile();
console.log('ID: '+ profile.getId()); // Do not send to your backend! Use an ID token instead.
function renderButton() {
gapi.signin2.render('g-signin2', {
'scope': 'profile email',
'width': 250,
'height': 40,
'longtitle': true,
'theme': 'dark',
'onsuccess': onSignIn,
'onfailure': onFailure
});
}
function onSignIn(googleUser) {
var profile = googleUser.getBasicProfile();
console.log('ID: ' + profile.getId()); // Do not send to your backend! Use an ID token instead.
console.log('Name: ' + profile.getName());
console.log('Image URL: ' + profile.getImageUrl());
console.log('Email: ' + profile.getEmail());
var googleTockenId = profile.getId();
var name = profile.getName();
var email = profile.getEmail();
var profile = profile.getImageUrl();
$("#loaderIcon").show('fast');
$("#g-signin2").hide('fast');
saveUserData(googleTockenId,name,email,profile); // save data to our database for reference
}
// Sign-in failure callback
function onFailure(error) {
alert(error);
}
// Sign out the user
function signOut() {
if(confirm("Are you sure to signout?")){
var auth2 = gapi.auth2.getAuthInstance();
auth2.signOut().then(function () {
$("#loginDetails").hide();
$("#loaderIcon").hide('fast');
$("#g-signin2").show('fast');
});
auth2.disconnect();
}
}
function saveUserData(googleTockenId,name,email,profile) {
$.post("script.php",{authProvider:"Google",googleTockenId:googleTockenId,name:name,email:email,profile:profile},
function (response) {
var data = response.split('^');
if (data[1] == "loggedIn"){
$("#loaderIcon").hide('fast');
$("#g-signin2").hide('fast');
$("#profileLabel").attr('src',profile);
$("#nameLabel").html(name);
$("#emailLabel").html(email);
$("#googleIdLabel").html(googleTockenId);
$("#loginDetails").show();
}
});
}
By default after page load this function renderButton( ) is called automatically.
script.php
<?php
include "config.php";
if ($_POST['authProvider'] == "Google"){
$authProvider = $_POST['authProvider'];
$googleTockenId = $_POST['googleTockenId'];
$name = $_POST['name'];
$email = $_POST['email'];
$profile = $_POST['profile'];
$now = date('Y-m-d H:i:s');
// Check whether the user data already exist in the database
$queryCheck = "SELECT * FROM bird_google_auth WHERE authProvider = '$authProvider' AND googleIdTocken = '$googleTockenId'";
$resultCheck = $connection->query($queryCheck);
if ($resultCheck->num_rows>0){
$queryPerform = "UPDATE bird_google_auth SET authProvider = '$authProvider',googleIdTocken = '$googleTockenId',name='$name',
email='$email',profile='$profile',modified='$now' WHERE authProvider = '$authProvider' AND googleIdTocken = '$googleTockenId'";
}else{
$queryPerform = "INSERT INTO bird_google_auth SET authProvider = '$authProvider', googleIdTocken = '$googleTockenId',name='$name',
email='$email',profile='$profile',created='$now',modified='$now' ";
}
$finalResultset = $connection->query($queryPerform) or die("Error in query".$connection->error);
if($finalResultset){
echo "test^loggedIn";
}
}
<?php
include"config.php";
if($_POST['authProvider']=="Google"){
$authProvider=$_POST['authProvider'];
$googleTockenId=$_POST['googleTockenId'];
$name=$_POST['name'];
$email=$_POST['email'];
$profile=$_POST['profile'];
$now=date('Y-m-d H:i:s');
// Check whether the user data already exist in the database
$queryCheck="SELECT * FROM bird_google_auth WHERE authProvider = '$authProvider' AND googleIdTocken = '$googleTockenId'";
$resultCheck=$connection->query($queryCheck);
if($resultCheck->num_rows>0){
$queryPerform="UPDATE bird_google_auth SET authProvider = '$authProvider',googleIdTocken = '$googleTockenId',name='$name',
email='$email',profile='$profile',modified='$now' WHERE authProvider = '$authProvider' AND googleIdTocken = '$googleTockenId'";
}else{
$queryPerform="INSERT INTO bird_google_auth SET authProvider = '$authProvider', googleIdTocken = '$googleTockenId',name='$name',
die("Error in connection".$connection->connect_error);
}
<?php
$connection = new mysqli("localhost","root","","codingbirds");
if (! $connection){
die("Error in connection".$connection->connect_error);
}
3- Run the Code!
When you run the code and if everything is fine. You will get something like this. Don’t worry I will provide the 100% working source code. You only need to change the client ID only.
I hope you learned explained above, If you have any suggestions, are appreciated. And if you have any errors comment here, I will help. You can download the full 100% working source code from here.
Ok, Thanks for reading this article, see you in the next post. If this code works for you, please leave a comment so that others can find code useful.
Hi, If you are looking for the PHP script to learn how to send email with attachment in PHP without going to spam then you are in the right place. I know you searched a lot on Google to find source code but every code sends that to spam, not in the inbox. Check our demo to confirm.
Here I am going to give a PHP script by which your email with an attachment will always go to inbox. Sending an email with attachment is the most common task in web development.
When you are applying for a job or submitting any application, you often might be noticed that they accept a file to upload. It may be anything like your CV or resume, profile picture or any other document.
Sending details to email is sometimes good in terms of saving space on our server. Since we are not storing the details on our database or attachment to our server folders.
How to do that?
Here we will use a simple HTML form accepting basic details like name, email, subject, message, and an attachment. The attachment has a validation that only PDF, DOC, JPG, JPEG, & PNG files are allowed to upload. In the previous tutorial, we learned about how to send email in PHP step by step but here we will do the same with attachment.
So what are we waiting for? Let’s start. Check the files and folder we are going to create.
index.php is the main file which is a simple HTML form as I told above.
email-script.php is the script file that sends an email with an attachment.
validation-script.js is a javaScript validation file.
uploads folder saves the attachment to send emails and deletes later.
Now we should create these files. I am giving you just code block here. Make sure you put these CDN in to head off your index.php to work your code.
function validateEmailSendForm() {
var name = $("#name").val();
var email = $("#email").val();
var subject = $("#subject").val();
var message = $("#message").val();
var attachment = $("#attachment").val();
if (name == ""){
$("#nameError").show();
$("#nameError").html("Please enter your name");
$("#nameError").fadeOut(4000);
$("#name").focus();
return false;
}else if (email == ""){
$("#emailError").show();
$("#emailError").html("Please enter your email");
$("#emailError").fadeOut(4000);
$("#email").focus();
return false;
}else if (!validateEmail(email)){
$("#emailError").show();
$("#emailError").html("Please enter valid email");
$("#emailError").fadeOut(4000);
$("#email").focus();
return false;
}else if (subject == ""){
$("#subjectError").show();
$("#subjectError").html("Please enter subject");
$("#subjectError").fadeOut(4000);
$("#subject").focus();
return false;
}else if (message == ""){
$("#messageError").show();
$("#messageError").html("Please enter some message");
$("#messageError").fadeOut(4000);
$("#message").focus();
return false;
}else if (attachment == ""){
$("#attachmentError").show();
$("#attachmentError").html("Please select a attachment");
$("#attachmentError").fadeOut(4000);
$("#attachment").focus();
return false;
}else{
return true;
}
function validateEmail(inputText) {
var mailformat = /^\w+([\.-]?\w+)*@\w+([\.-]?\w+)*(\.\w{2,3})+$/;
if(inputText.match(mailformat)) {
return true;
} else{
return false;
}
}
}
function validateEmailSendForm(){
var name = $("#name").val();
var email = $("#email").val();
var subject = $("#subject").val();
var message = $("#message").val();
var attachment = $("#attachment").val();
if(name ==""){
$("#nameError").show();
$("#nameError").html("Please enter your name");
$("#nameError").fadeOut(4000);
$("#name").focus();
returnfalse;
}elseif(email ==""){
$("#emailError").show();
$("#emailError").html("Please enter your email");
$("#emailError").fadeOut(4000);
$("#email").focus();
returnfalse;
}elseif(!validateEmail(email)){
$("#emailError").show();
$("#emailError").html("Please enter valid email");
$("#emailError").fadeOut(4000);
$("#email").focus();
returnfalse;
}elseif(subject ==""){
$("#subjectError").show();
$("#subjectError").html("Please enter subject");
$("#subjectError").fadeOut(4000);
$("#subject").focus();
returnfalse;
}elseif(message ==""){
$("#messageError").show();
$("#messageError").html("Please enter some message");
$("#messageError").fadeOut(4000);
$("#message").focus();
returnfalse;
}elseif(attachment ==""){
$("#attachmentError").show();
$("#attachmentError").html("Please select a attachment");
$("#attachmentError").fadeOut(4000);
$("#attachment").focus();
returnfalse;
}else{
returntrue;
}
function validateEmail(inputText){
var mailformat =/^\w+([\.-]?\w+)*@\w+([\.-]?\w+)*(\.\w{2,3})+$/;
if(inputText.match(mailformat)){
returntrue;
}else{
returnfalse;
}
}
}
function validateEmailSendForm() {
var name = $("#name").val();
var email = $("#email").val();
var subject = $("#subject").val();
var message = $("#message").val();
var attachment = $("#attachment").val();
if (name == ""){
$("#nameError").show();
$("#nameError").html("Please enter your name");
$("#nameError").fadeOut(4000);
$("#name").focus();
return false;
}else if (email == ""){
$("#emailError").show();
$("#emailError").html("Please enter your email");
$("#emailError").fadeOut(4000);
$("#email").focus();
return false;
}else if (!validateEmail(email)){
$("#emailError").show();
$("#emailError").html("Please enter valid email");
$("#emailError").fadeOut(4000);
$("#email").focus();
return false;
}else if (subject == ""){
$("#subjectError").show();
$("#subjectError").html("Please enter subject");
$("#subjectError").fadeOut(4000);
$("#subject").focus();
return false;
}else if (message == ""){
$("#messageError").show();
$("#messageError").html("Please enter some message");
$("#messageError").fadeOut(4000);
$("#message").focus();
return false;
}else if (attachment == ""){
$("#attachmentError").show();
$("#attachmentError").html("Please select a attachment");
$("#attachmentError").fadeOut(4000);
$("#attachment").focus();
return false;
}else{
return true;
}
function validateEmail(inputText) {
var mailformat = /^\w+([\.-]?\w+)*@\w+([\.-]?\w+)*(\.\w{2,3})+$/;
if(inputText.match(mailformat)) {
return true;
} else{
return false;
}
}
}
Run the code!
Now it is time to run and test our code. If you did everything step by step then you will not face any errors and you will get output something like this.
This form is validated properly like empty fields, valid email and attachment file accepted. When you fill that form and hit the submit button then you will get the alert message of success or errors.
Attention !!! It may take 1 or 2 minutes to receive email with attachment so please have patience. But I am sure you will receive in primary inbox not to spam.
I hope you learned explained above, If you have any suggestions, are appreciated. And if you have any errors comment here. You can download the full 100% working source code from here.
Ok, Thanks for reading this article, see you in the next post.
Making users active inactive is the most important and common feature in web applications and websites. In this tutorial, we are going to learn how to make active inactive users in PHP using jQuery AJAX without page refresh. You check this demo also. You can implement the same code with CodeIgniter as CI follows the MVC pattern.
Why we need it?
Suppose you have a web application in which employees doing registration and then after login and performs their tasks. Now if any user is doing some inappropriate activities then you disable his login account.
consider this example as you have a list of users or employees and you want to disable his account so that he failed to login. To do this just need to press a thumb down button and his status in the database table will be 0. And In the login query, you make check the only those people can log in to the system whose status is 1.
So what are you waiting for? let’s get started. Check these files and folder structure.
index.php is the main file on which everything is to be performed
script.php is a logic file contains the code to perform active inactive operations
script.php uses the config.php is the connection file to the database
active-inactive-script.js is the javaScript file in which we wrote AJAX to avoid page refresh
bird_active_inactive_users.sql is the SQL file which is a database table which the following structure.
Don’t worry I will provide the full 100% working source code so that you can download it and implement it to your machine. Let’s create these files. Make sure you use bootstrap and jQuery. Bootstrap is just for styling and optional but jQuery is mandatory since we are making AJAX request.
And include this custom javaScript AJAX request file to the just below to jQuery. Here I am using version 3.4 of jQuery CDN. Here we are using javaScript and jQuery to enhance user experience.
die("Error in connection".$connection->connect_error);
}
<?php
$connection = new mysqli("localhost","root","","codingbirds");
if (! $connection){
die("Error in connection".$connection->connect_error);
}
Run the Code!
If you followed the steps and you are confident that everything is fine then its time to check the code. Then you will get the output something like this. Create the table and have some data otherwise you will get blank or you can import the same table as I will provide the source code.
The red button is to inactive the user and green is to make the user active. Here I haven’t created a login system. This tutorial is to demonstrate how to make active inactive users in PHP using jQuery AJAX.
I hope you learned explained above, If you have any suggestions, are appreciated. And if you have any errors comment here. You can download the full 100% working source code from here.
Ok, Thanks for reading this article, see you in the next post.
To hide email addresses or contact numbers partially is the most common thing in web application development. If you might have noticed on so many websites when you register by using your email id or contact number, then they shoot a verification code on your email or phone.
And you can’t see the full email address or contact. They make it partially hidden by using some stars *. You can check this demo also.
So If you are looking to do the same thing on PHP and looking for how to partially hide email address in PHP using AJAX then you are in the right place.
Here I will use a simple form accepting email id. When you press the submit button you will get a partially hidden email without page refresh.
To do this I will use AJAX functionality so that we can achieve this without page refresh. So without wasting time lets make out hands dirty with code.
Create index.php file is the main file
Now create script.php file is the logic file to hide email address partially.
I hope you learned explained above, If you have any suggestions, are appreciated. And if you have any errors comment here. You can download the full 100% working source code from here.
Ok, Thanks for reading this article, see you in the next post.
If you are looking to learn how to create CRUD application in PHP then you are in the right place. In a web application, 4 operations are mainly performed, Create, Read, Update and Delete. These are called CRUD operations in short.
Create – This is to save the data to the database.
Read – This is the operation to read or display the saved data from the database.
Update – This is to update the existing records in a database.
Delete – Last but not least, this is used to perform delete operation in the database.
Each operation has its own query syntax to perform its task. Let’s take a look at each query and we will understand its concepts.
Ultimately we perform CRUD operation in any complex web application or website by different techniques and methods.
Today, I am very happy to share with you CRUD application in PHP using jQuery AJAX from scratch. But today I will show you a very simple way to CRUD using a bootstrap popup model.
How to do that?
In this tutorial, I will use a bootstrap popup model in which I will place a registration form asking to fill name, email, and contact.
After that, I will fetch the records from the database and display them without page refresh that’s why we are using AJAX.
Resources to perform CRUD operations
It is mandatory to use jQuery library to use AJAX functionality.
Here I will use a popup model on the click of the add button so that we can do this without a page refresh, That’s why we need bootstrap also. This will be good for styling purposes too.
That’s enough!
Lets first see the files and folder structure we are going to create for CRUD application in PHP using jQuery AJAX.
Let’s understand the task of these files. Each file has its own task.
config.php is the connection file to the database.
crud-app.js is a javaScript file responsible to make AJAX call to accomplish not to page refresh.
crud-script.php has the logics of CRUD means to create, read, delete and update.
CrudOprations.php is a PHP class that has user-defined functions. Since we are going to use the OOPs methodology.
custom.css is CSS file to just to style something nothing else.
finally, index.php is the main file on which everything is to be performed.
crud_applications.sql is just an SQL file which is a database table. The table has this structure and you to create this in your database.
Don’t worry, I will provide the SQL file, Source code link is at the end of this post. Please include these CDN in the head tag of your index.php file.
die("Error in connection".$connection->connect_error);
}
<?php
$connection = new mysqli("localhost","root","","codingbirds");
if (! $connection){
die("Error in connection".$connection->connect_error);
}
CrudOperations.php file
<?php
class CrudOperations
{
public function saveData($connection,$name,$email,$contact,$editId)
{
if ($editId == "") {
$query = "INSERT INTO crud_application SET name='$name',email='$email',contact='$contact'";
}else{
$query = "UPDATE crud_application SET name='$name',email='$email',contact='$contact' WHERE id='$editId'";
}
$result = $connection->query($query) or die("Error in saving data".$connection->error);
return $result;
}
public function getAllData($connection)
{
$query = "SELECT * FROM crud_application";
$result = $connection->query($query) or die("Error in getting data".$connection->error);
return $result;
}
public function deleteData($connection,$deleteId){
$query = "DELETE FROM crud_application WHERE id='$deleteId'";
$result = $connection->query($query) or die("Error in deleting data".$connection->error);
return $result;
}
}
$query="INSERT INTO crud_application SET name='$name',email='$email',contact='$contact'";
}else{
$query="UPDATE crud_application SET name='$name',email='$email',contact='$contact' WHERE id='$editId'";
}
$result=$connection->query($query)ordie("Error in saving data".$connection->error);
return$result;
}
publicfunctiongetAllData($connection)
{
$query="SELECT * FROM crud_application";
$result=$connection->query($query)ordie("Error in getting data".$connection->error);
return$result;
}
publicfunctiondeleteData($connection,$deleteId){
$query="DELETE FROM crud_application WHERE id='$deleteId'";
$result=$connection->query($query)ordie("Error in deleting data".$connection->error);
return$result;
}
}
<?php
class CrudOperations
{
public function saveData($connection,$name,$email,$contact,$editId)
{
if ($editId == "") {
$query = "INSERT INTO crud_application SET name='$name',email='$email',contact='$contact'";
}else{
$query = "UPDATE crud_application SET name='$name',email='$email',contact='$contact' WHERE id='$editId'";
}
$result = $connection->query($query) or die("Error in saving data".$connection->error);
return $result;
}
public function getAllData($connection)
{
$query = "SELECT * FROM crud_application";
$result = $connection->query($query) or die("Error in getting data".$connection->error);
return $result;
}
public function deleteData($connection,$deleteId){
$query = "DELETE FROM crud_application WHERE id='$deleteId'";
$result = $connection->query($query) or die("Error in deleting data".$connection->error);
return $result;
}
}
Now if you run the code, if there are not any errors you will get something like this.
When you will submit this form you will the complete final output like this. And if you click on the Add New+ button this popup form will have appeared.
If you submit this form filling the asked values then the record will be displayed. And to inform you, everything will be on the same page without any reload. Again if you click on the edit button then the same bootstrap popup will appear with the values which you filled previously.
If you update the values then it will call ajax request, update them to the database and display again to the table.
So if you want to delete you can do it also. It will ask you “Are you sure to delete this ?”. If you confirm this then it will be deleted.
I hope you learned explained above, If you have any suggestions, are appreciated. And if you have any errors comment here. You can download the full 100% working source code from here.
Ok, Thanks for reading this article, see you in the next post.
The pie chart is the most important part of data visualization. If you are looking for the code to draw the dynamic pie chart according to your data then you are in the right place.
Our website Coding Birds Online provides the very simple, to the point and 100% working source code with a complete guide. You can check this demo also.
What is a pie chart?
A pie chart (or a circle chart) is a circular statistical graphic, which is divided into slices to illustrate numerical proportions. In a pie chart, the arc length of each slice (and consequently its central angle and area), is proportional to the quantity it represents. You can read more about this chart from here.
Why it is used?
If you are using a web application or website or any report generation software then you might have noticed this feature. Graphical or visual representation of data is usually a requirement for this software.
For example, You are using an ERP system of any college you might have seen your attendance in pie chart. If you are making any software for attendance management, then it will be a great feature to that.
Starting to Code
Sounds interesting? I know surely you are. Now that’s enough to understand. So what are you waiting for? let’s get started. Visit highcharts.com for reference. If you click on this link, it will give you the same code but with static data.
Create an HTML page (index.php) to display the pie chart
Get the required imports like JavaScripts to draw a pie chart
Paste these imports to the head tag of the index file.
Paste the javaScript code above the closing tag of the body.
These are the required imports to create a dynamic pie chart.
<!doctype html>
<html lang="en">
<head>
<meta charset="UTF-8">
<meta name="viewport" content="width=device-width, user-scalable=no, initial-scale=1.0, maximum-scale=1.0, minimum-scale=1.0">
<meta http-equiv="X-UA-Compatible" content="ie=edge">
<link rel="icon" href="https://codingbirdsonline.com/wp-content/uploads/2019/12/cropped-coding-birds-favicon-2-1-192x192.png" type="image/x-icon">
<script src="https://code.highcharts.com/highcharts.js"></script>
<script src="https://code.highcharts.com/modules/exporting.js"></script>
<script src="https://code.highcharts.com/modules/export-data.js"></script>
<script src="https://code.highcharts.com/modules/accessibility.js"></script>
<title>How to create dynamic pie chart - Coding Birds Online</title>
<style> .center-block { display: block;margin-left: auto;margin-right: auto; }</style>
</head>
<body>
<div class="container">
<center>
<div id="container"></div>
</center>
<img class="center-block" src="https://codingbirdsonline.com/wp-content/uploads/2019/12/cropped-coding-birds-favicon-2-1-192x192.png" width="50">
</div>
<?php
include "config.php"; // connection file with database
$query = "SELECT * FROM bird_pie_chart"; // get the records on which pie chart is to be drawn
$getData = $connection->query($query);
?>
<script>
// Build the chart
Highcharts.chart('container', {
chart: {
plotBackgroundColor: null,
plotBorderWidth: null,
plotShadow: false,
type: 'pie'
},
title: {
text: 'Programming Language Popularity, 2020'
},
tooltip: {
pointFormat: '{series.name}: <b>{point.percentage:.1f}%</b>'
},
accessibility: {
point: {
valueSuffix: '%'
}
},
plotOptions: {
pie: {
allowPointSelect: true,
cursor: 'pointer',
dataLabels: {
enabled: false
},
showInLegend: true
}
},
series: [{
name: 'Popularity',
colorByPoint: true,
data: [
<?php
$data = '';
if ($getData->num_rows>0){
while ($row = $getData->fetch_object()){
$data.='{ name:"'.$row->programming.'",y:'.$row->popularity.'},';
}
}
echo $data;
?>
]
}]
});
</script>
</body>
</html>
In this file, I am including a config.php, which is a connection file to the database. I am fetching records from the bird_pie_chart table. Don’t worry, I will provide the complete source code. The following is the database table structure.
In this example, I am showing you a comparison of programming languages, with dummy data. This is now the actual data. You can customize this code and database table according to your needs.
Step 2: Run the code to get the desired output !!! That’s it.
Output
when you run the code and make sure everything is fine, then you will get the same output as following.
I hope you learned explained above, If you have any suggestions, are appreciated. And if you have any errors comment here. You can download the full 100% working source code from here.